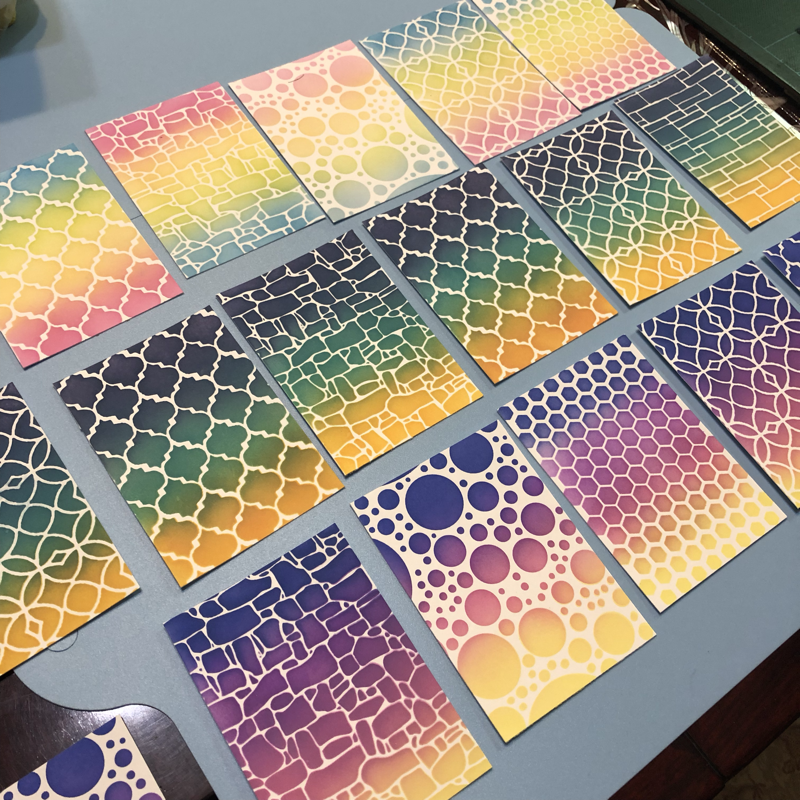
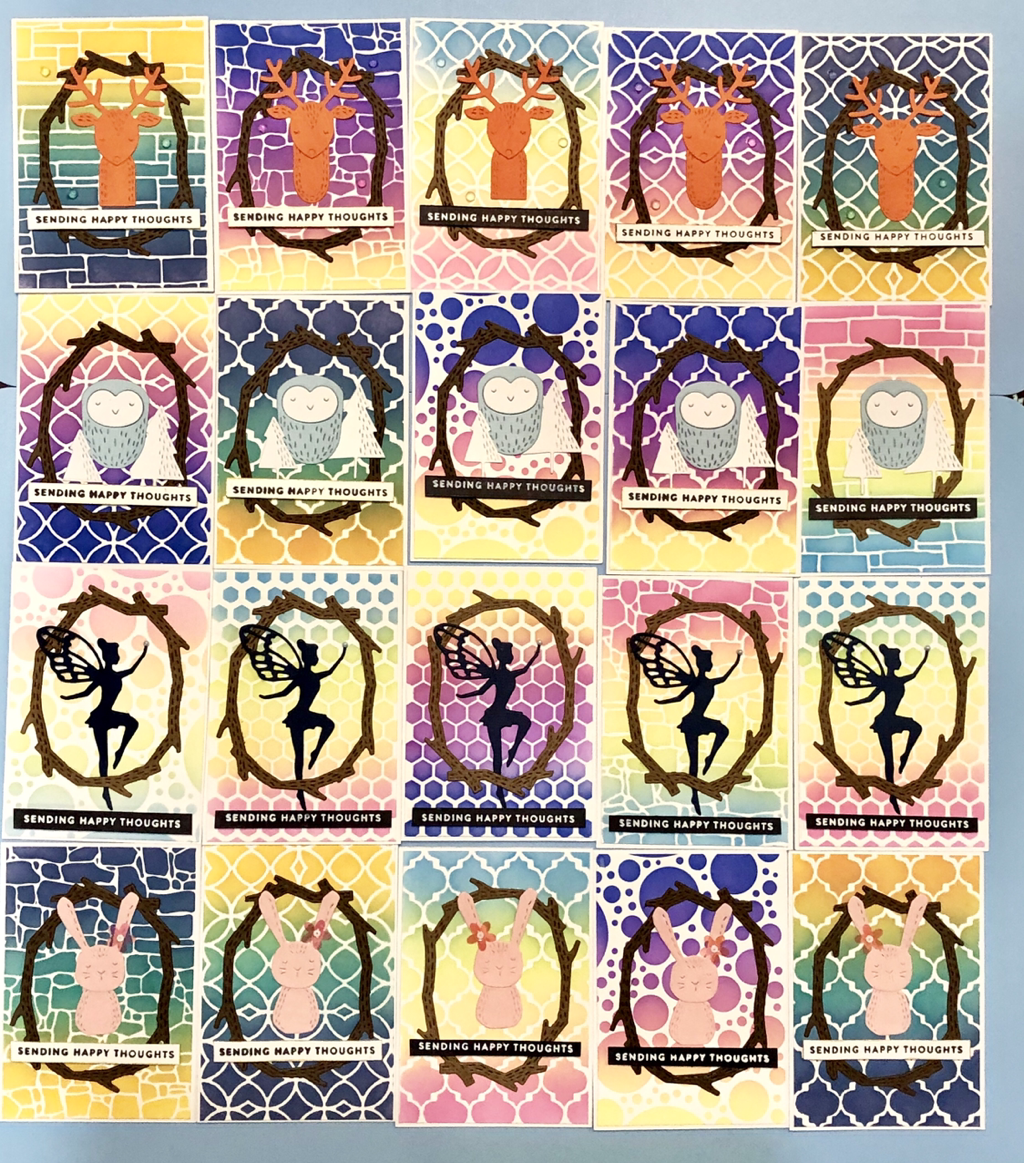
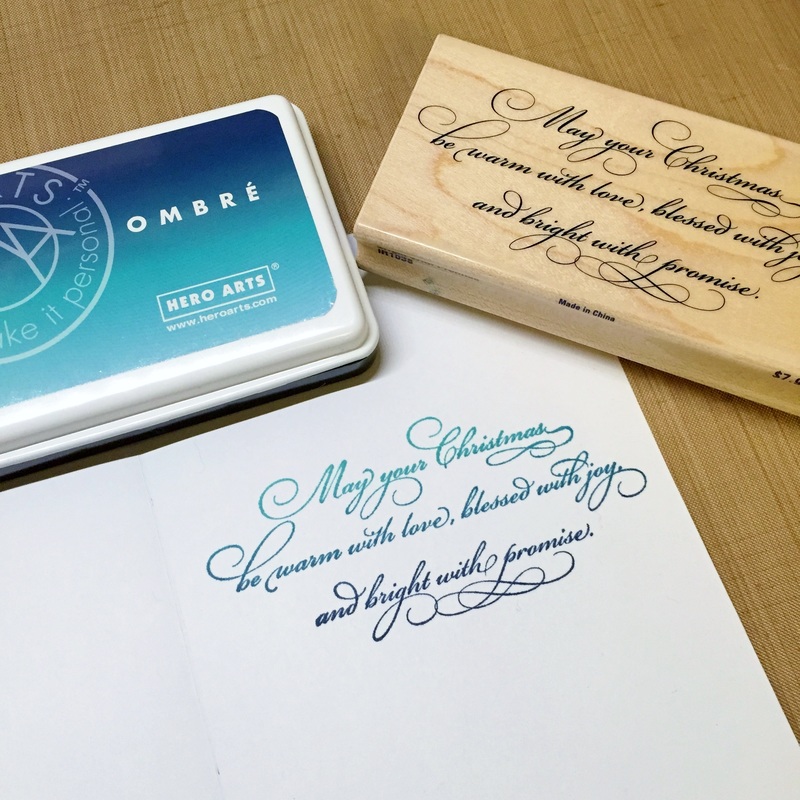
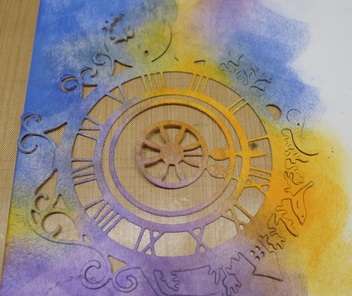
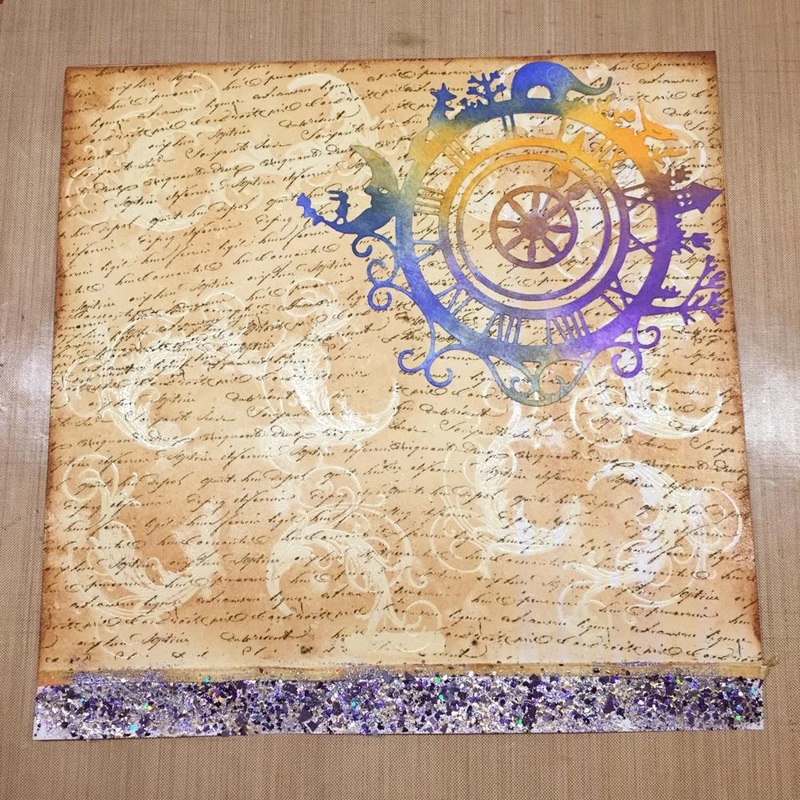
這個月的ATC交換卡是用型版來創作。想了一下型版的用法可多了🤔 可以和浮雕膏,裂劑合用,也可以遮掩或蓋印也可以壓凸但時間不夠所以選擇了最基本的上色方式。
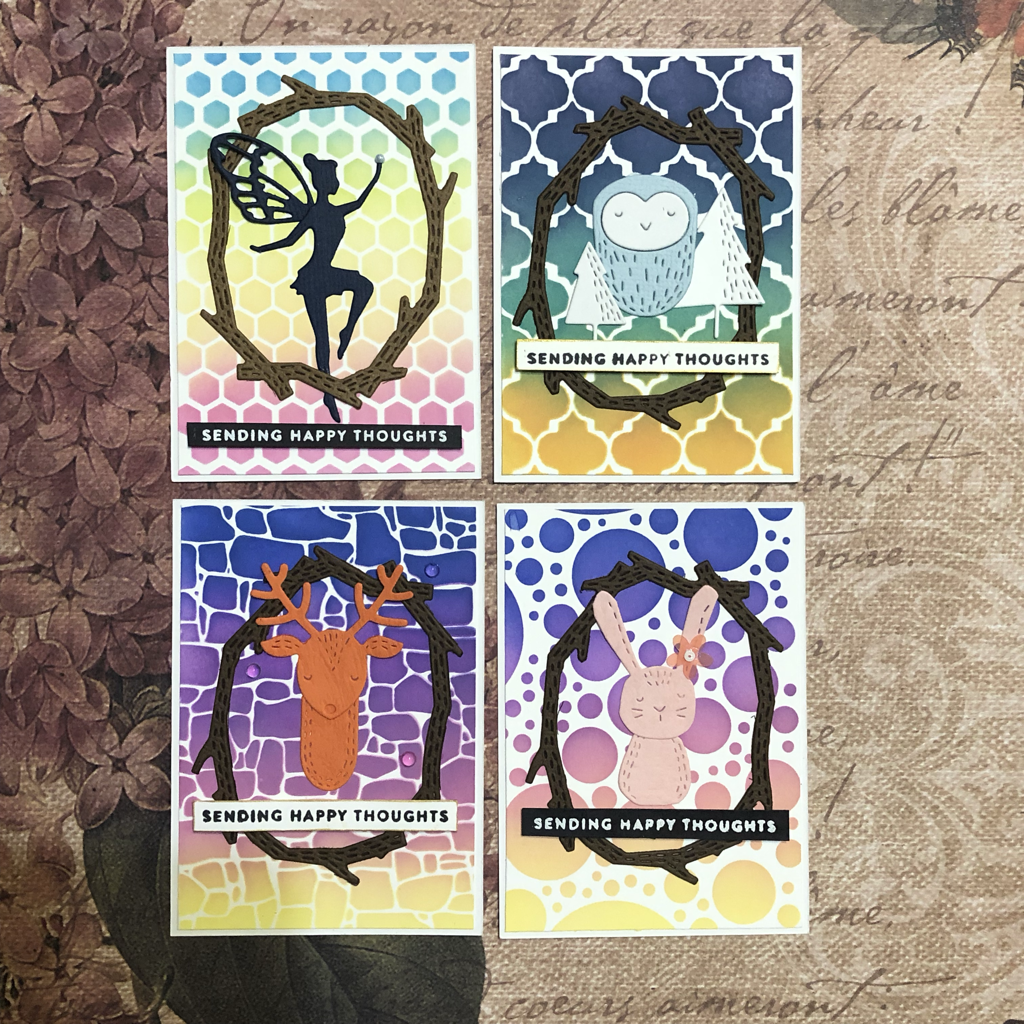
選擇了幾款型版和幾色比較喜歡的氧化印台用刷子簡單刷上色。
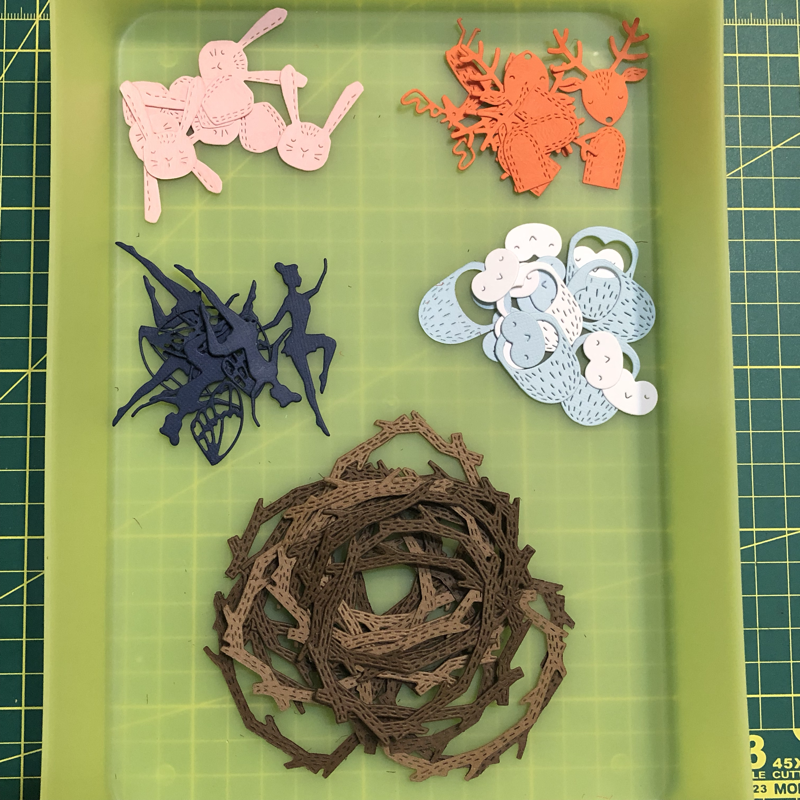

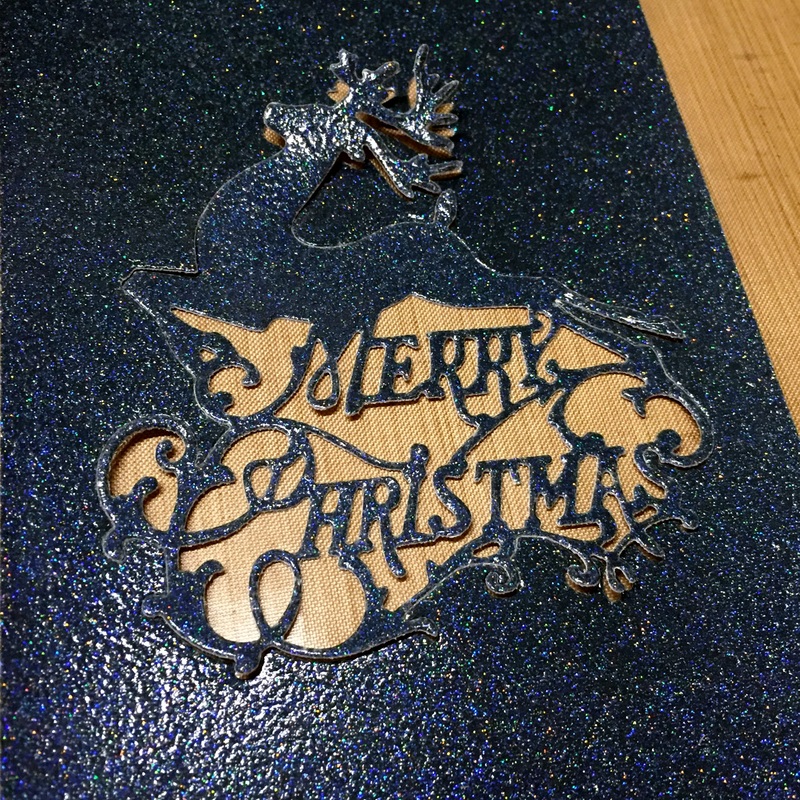
今次使用memory box的小刀模為主題,有精靈,貓頭鷹,麋鹿和兔子,非常可愛~
最後再來一張大合照
Thank you for visiting~
|

|
這個月的ATC交換卡是用型版來創作。想了一下型版的用法可多了🤔 可以和浮雕膏,裂劑合用,也可以遮掩或蓋印也可以壓凸但時間不夠所以選擇了最基本的上色方式。 選擇了幾款型版和幾色比較喜歡的氧化印台用刷子簡單刷上色。 今次使用memory box的小刀模為主題,有精靈,貓頭鷹,麋鹿和兔子,非常可愛~ 最後再來一張大合照 Thank you for visiting~
0 Comments
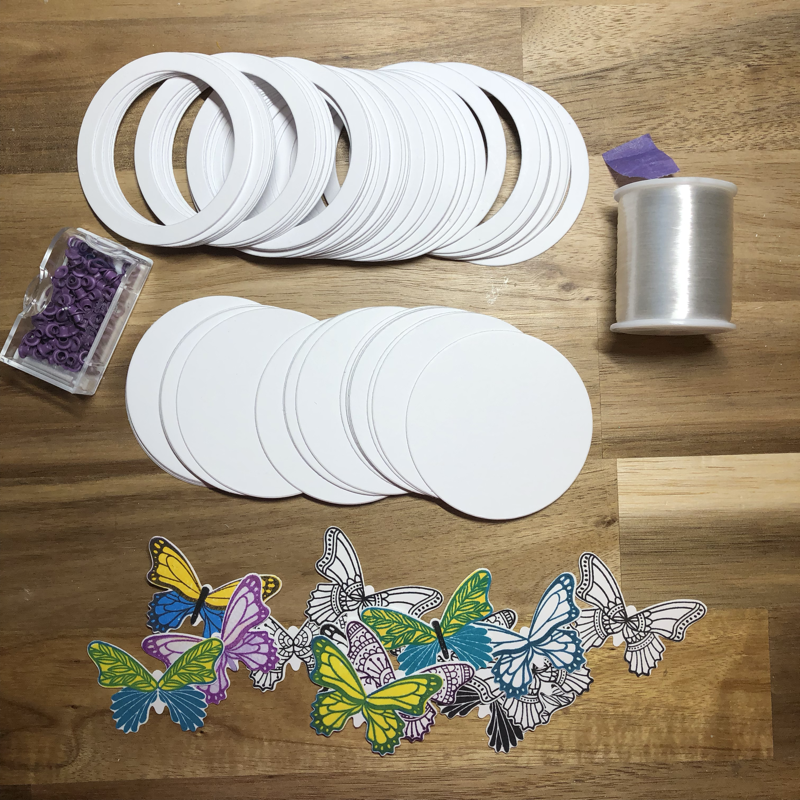
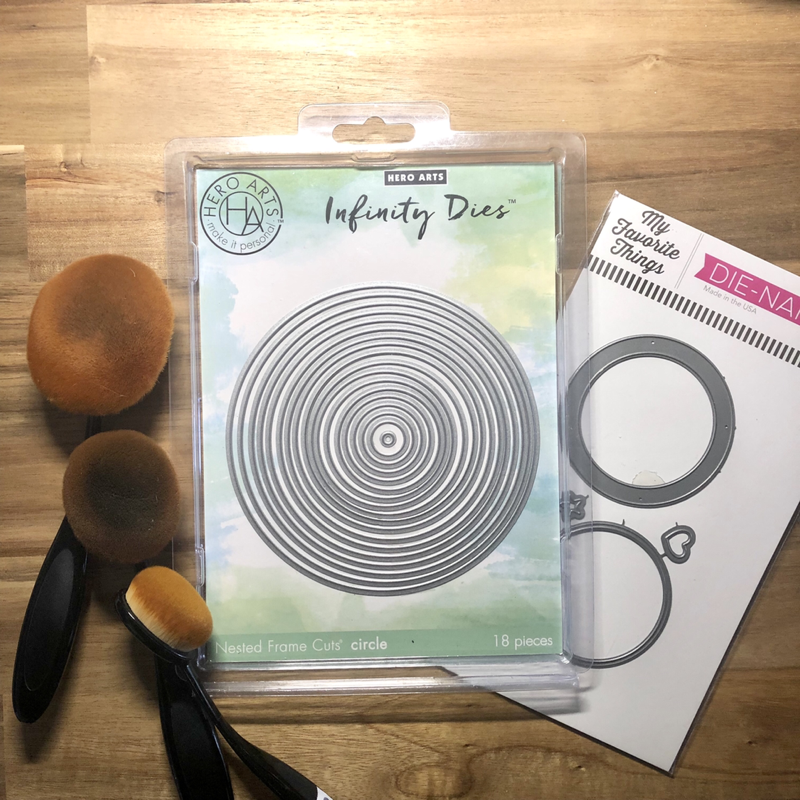
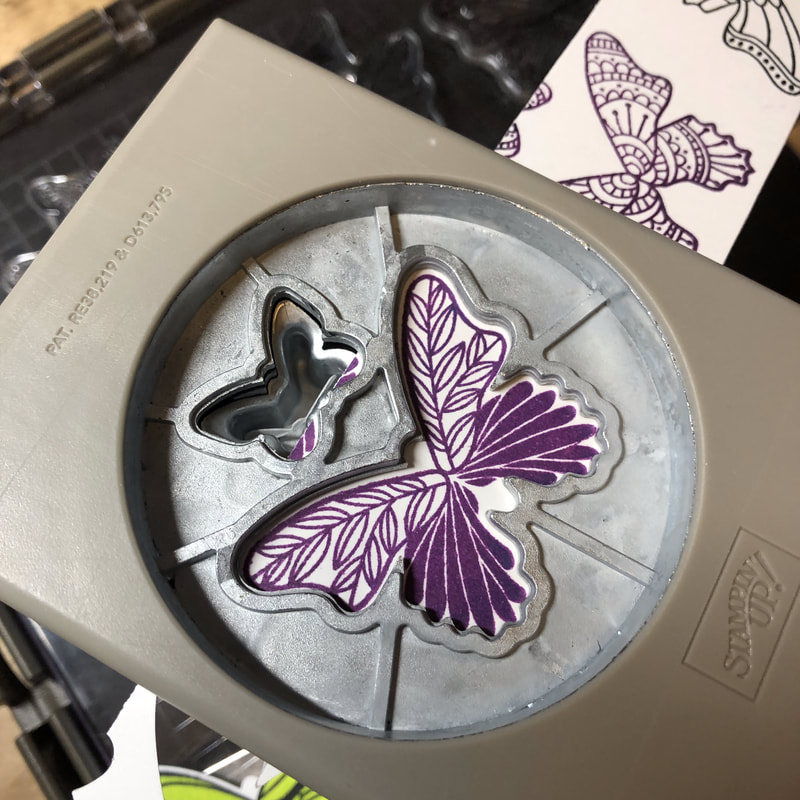
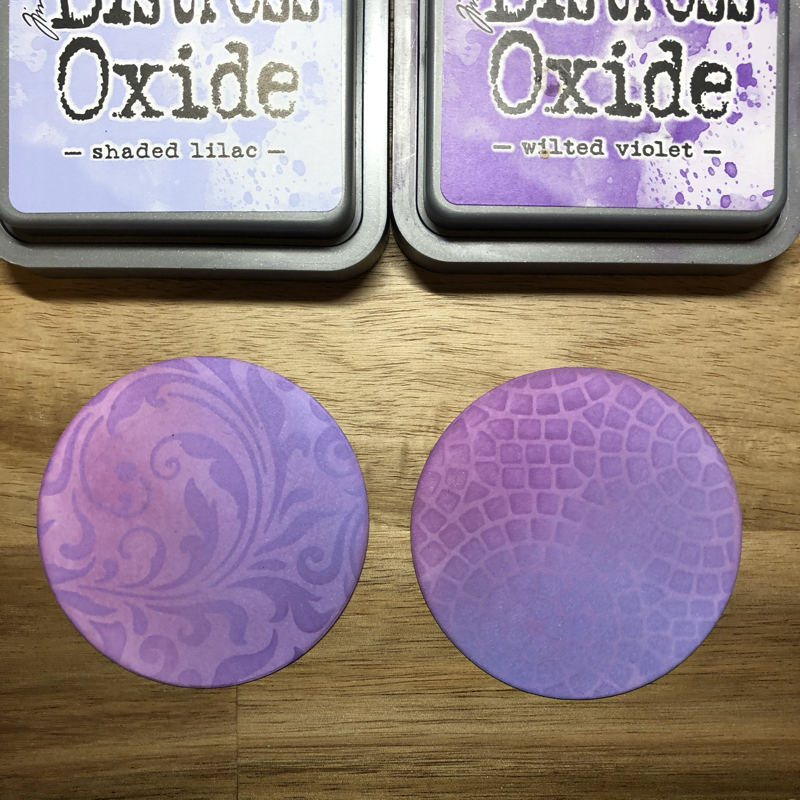
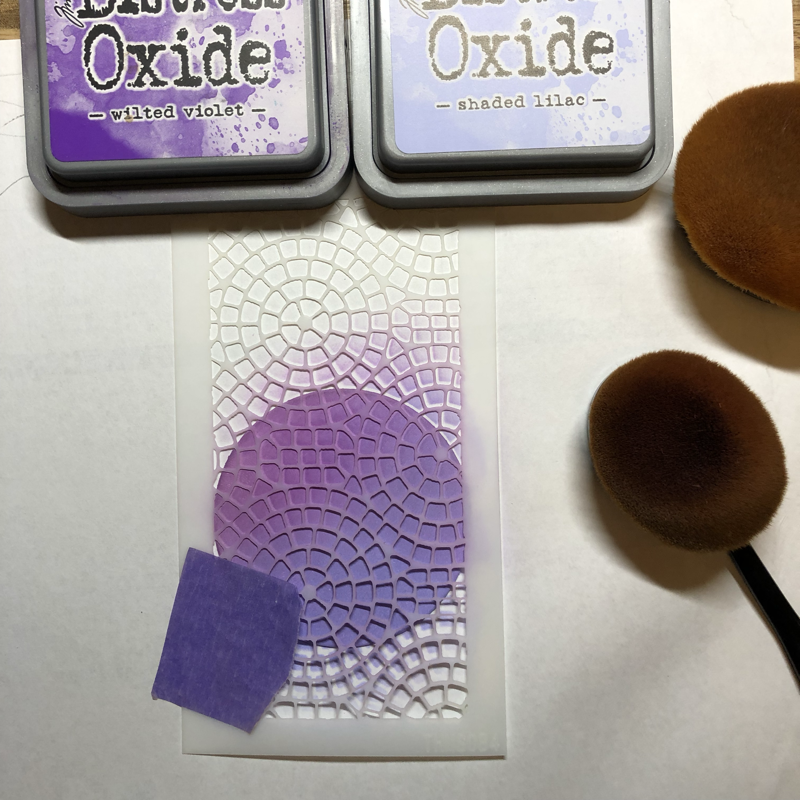
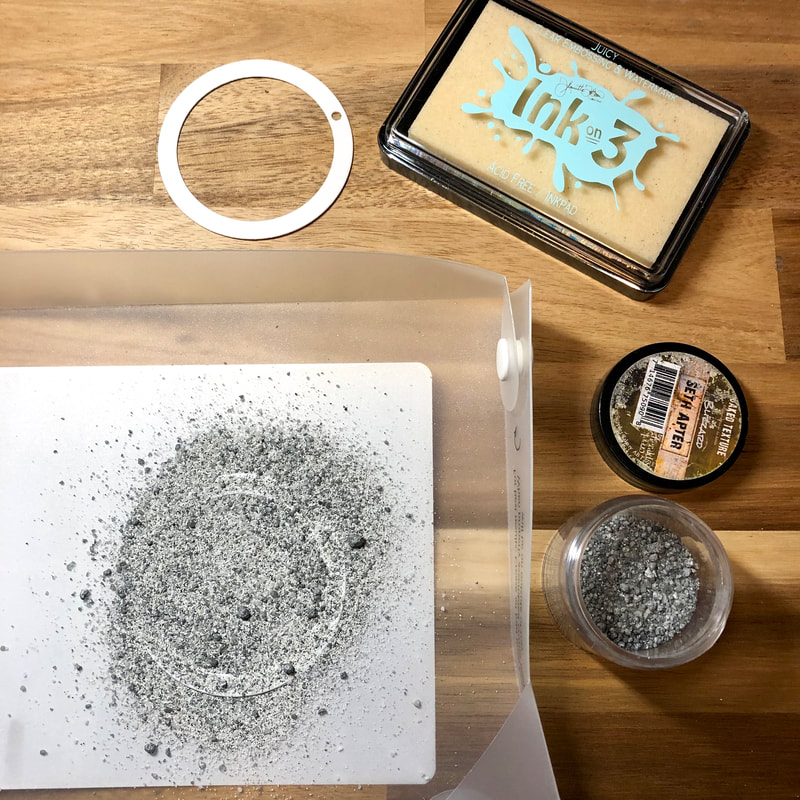
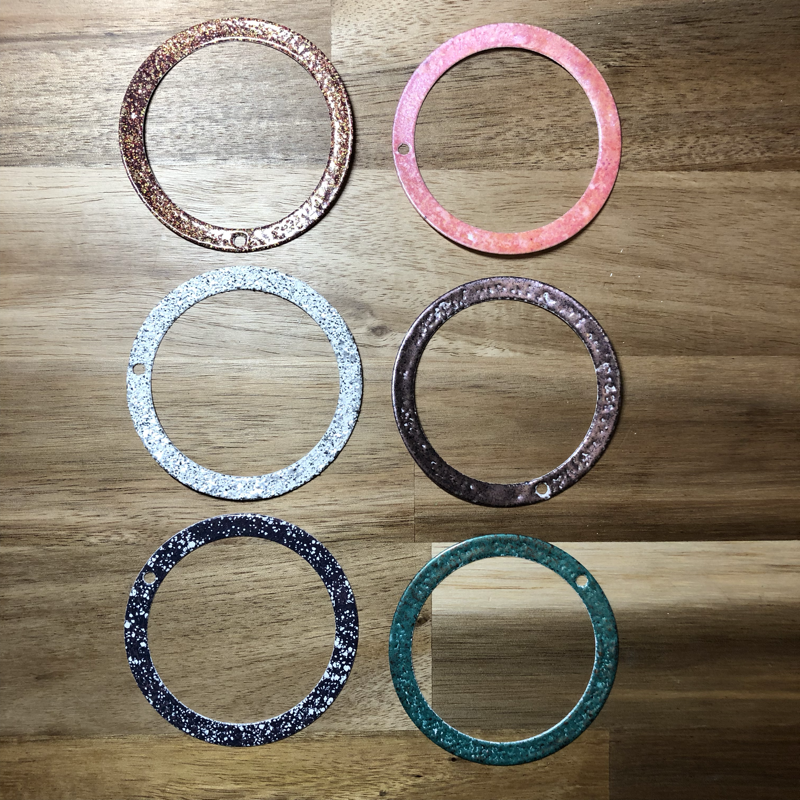
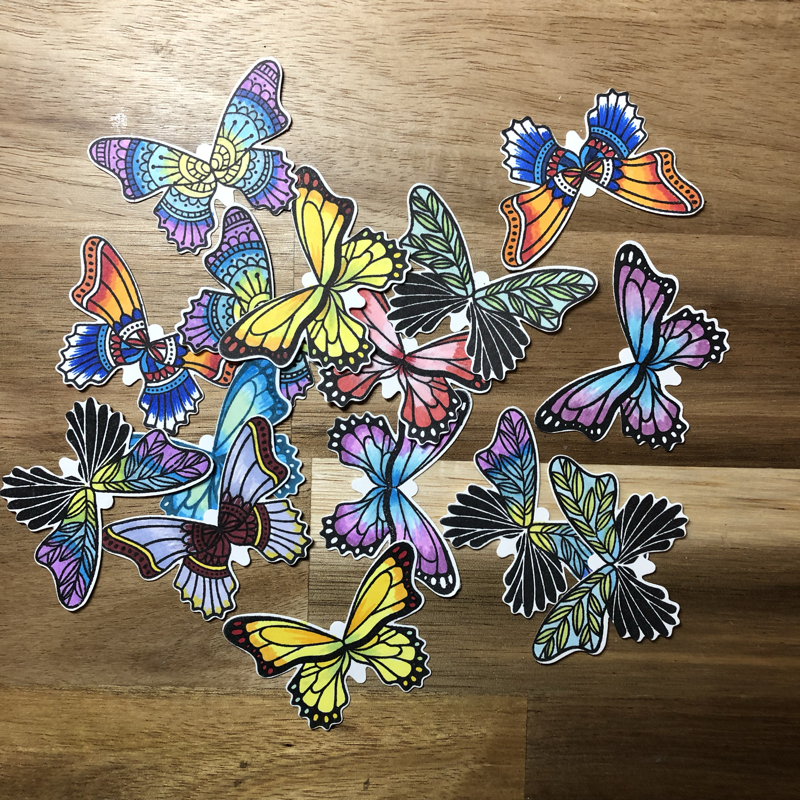
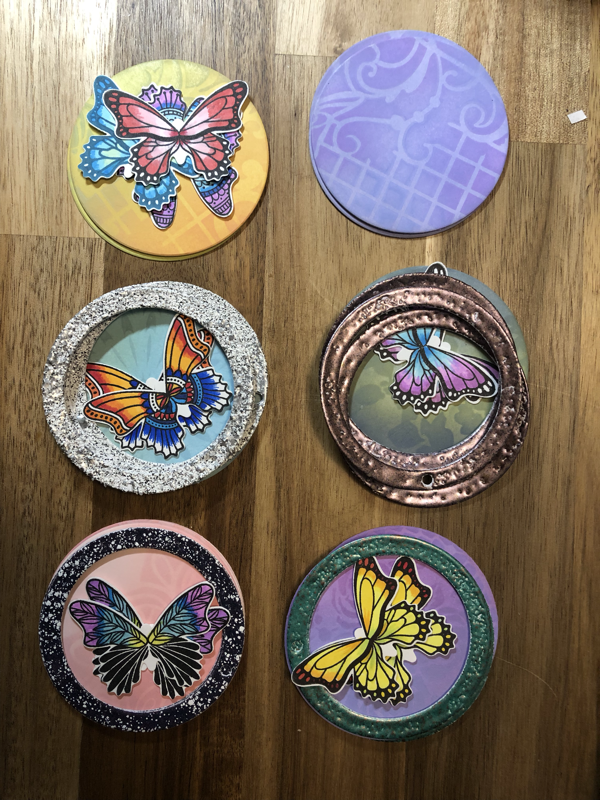
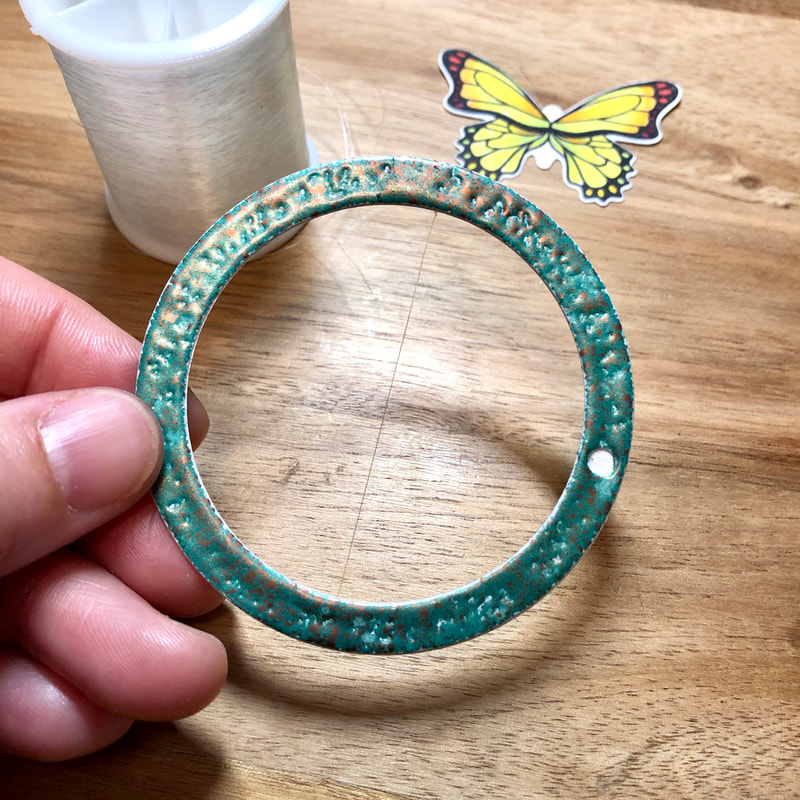
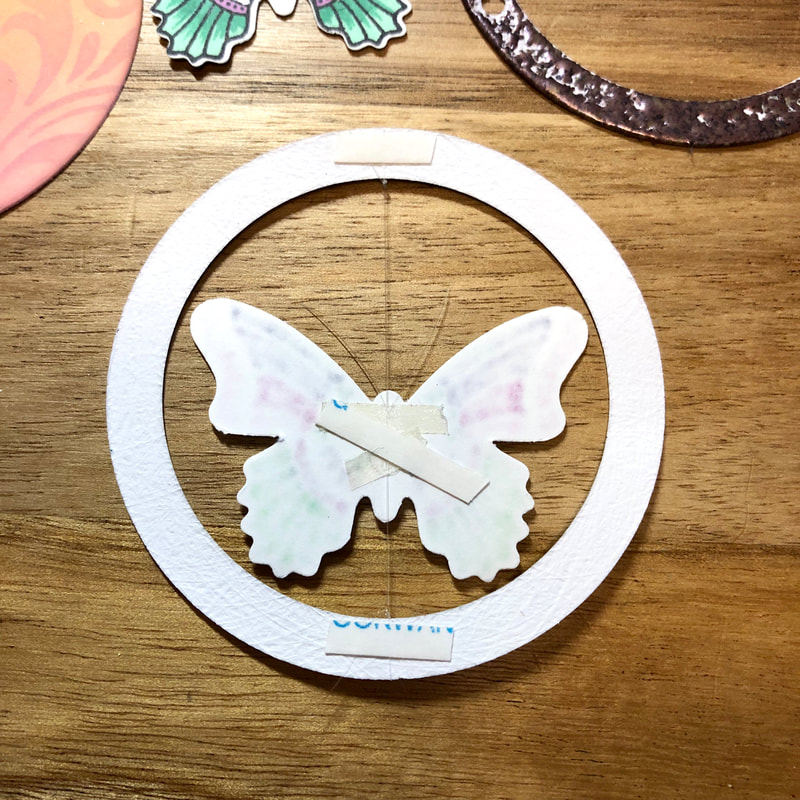
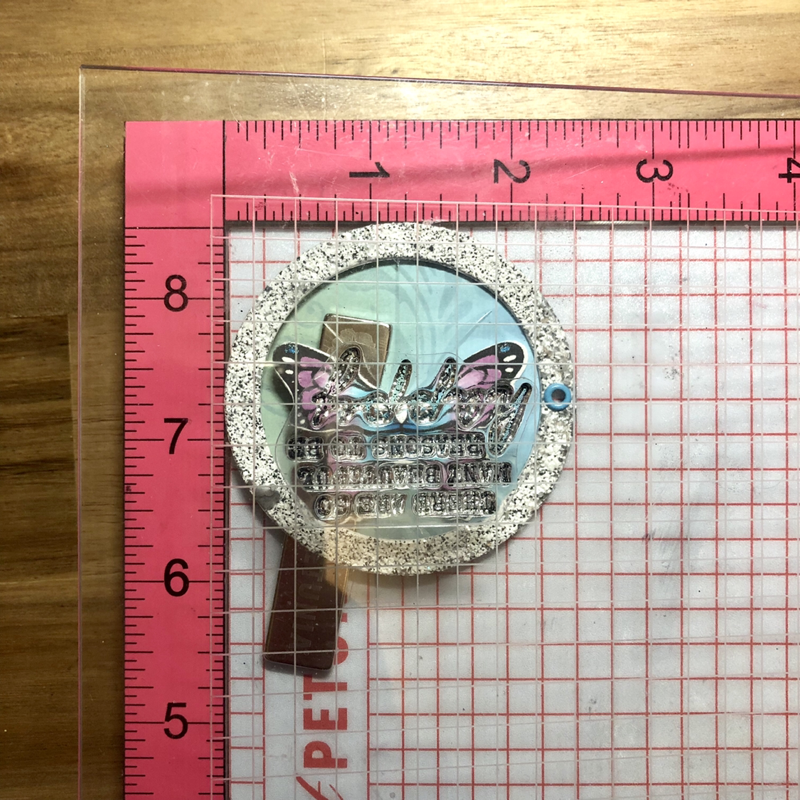
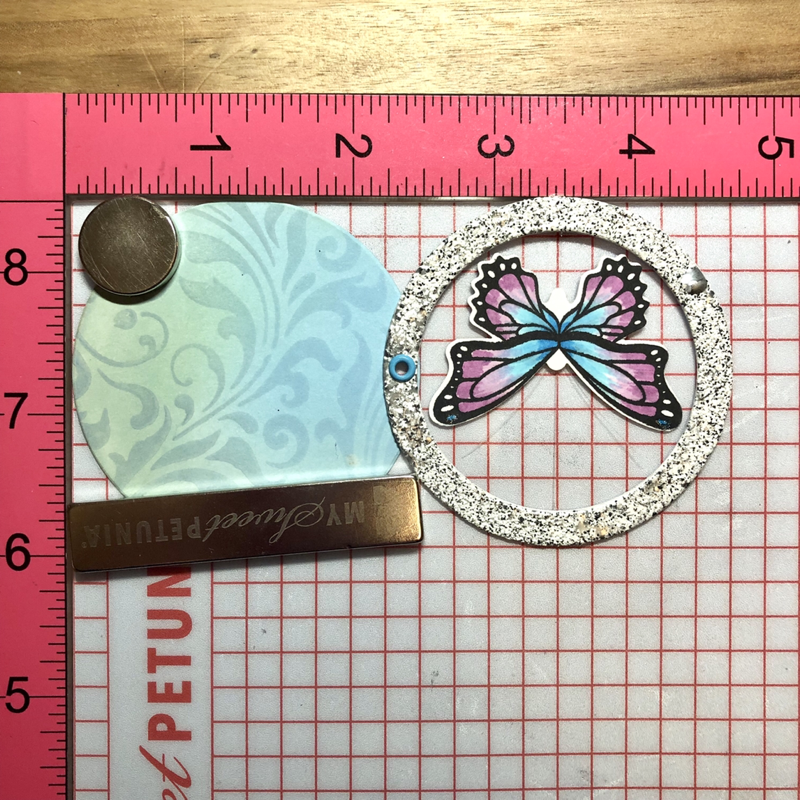
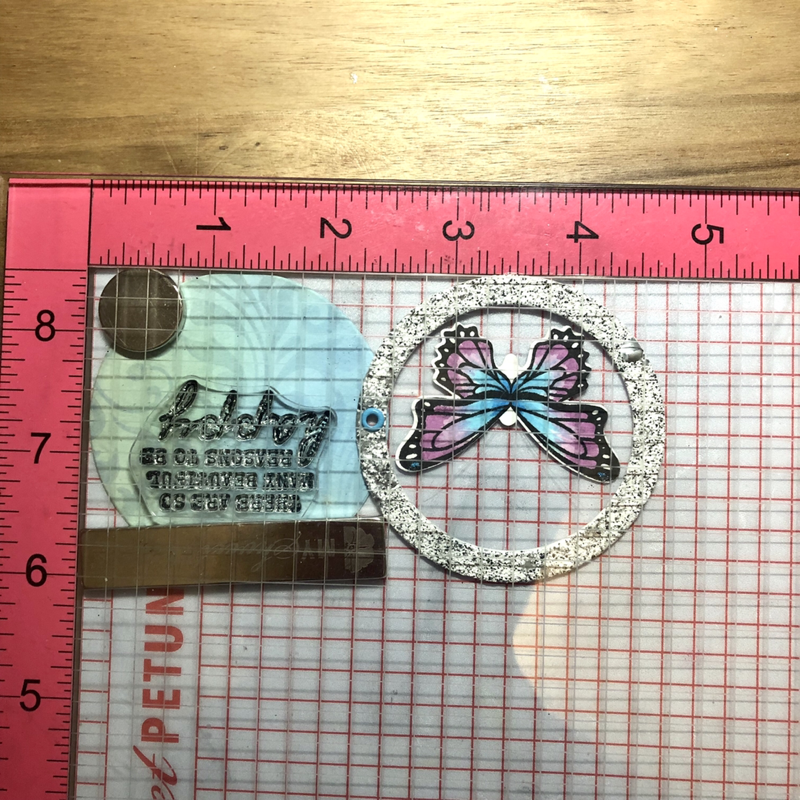
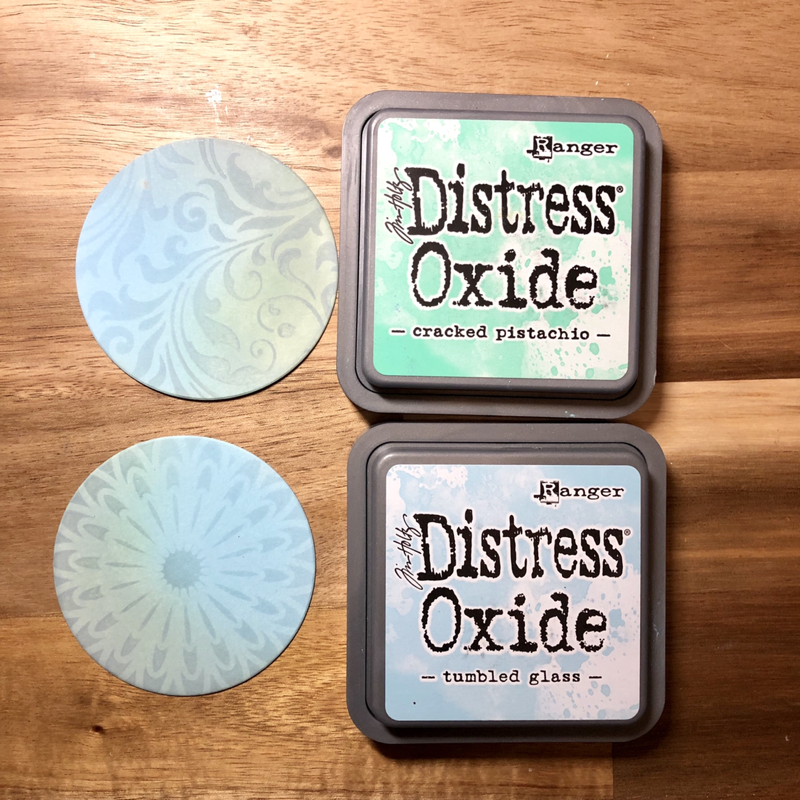
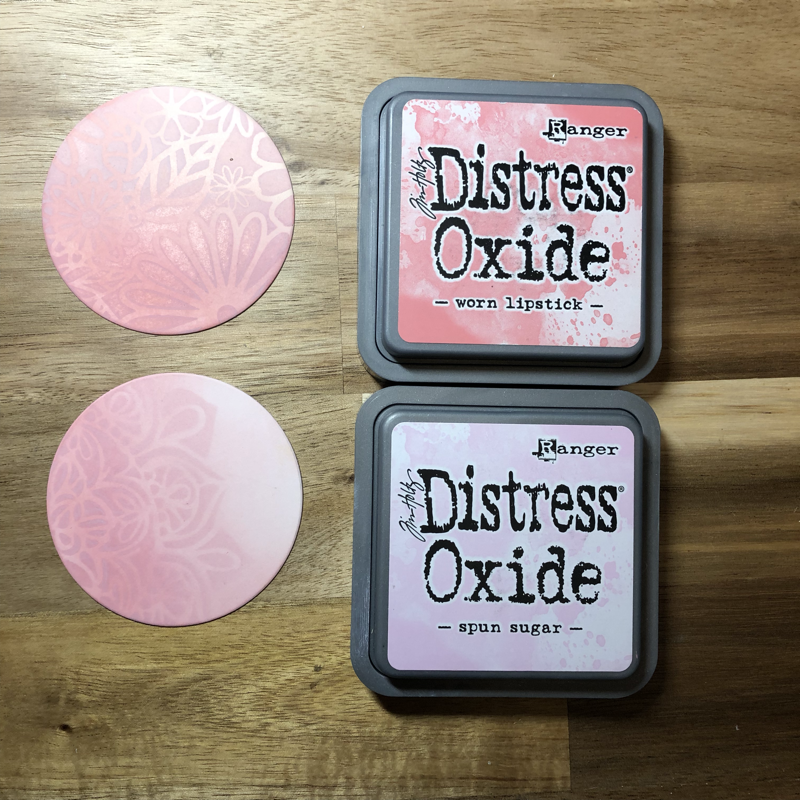
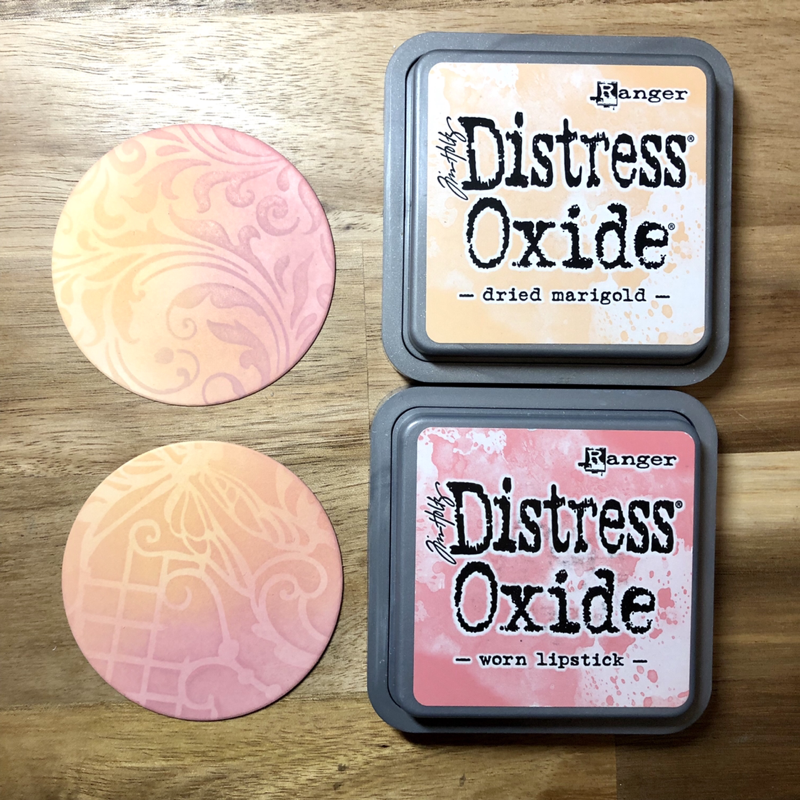
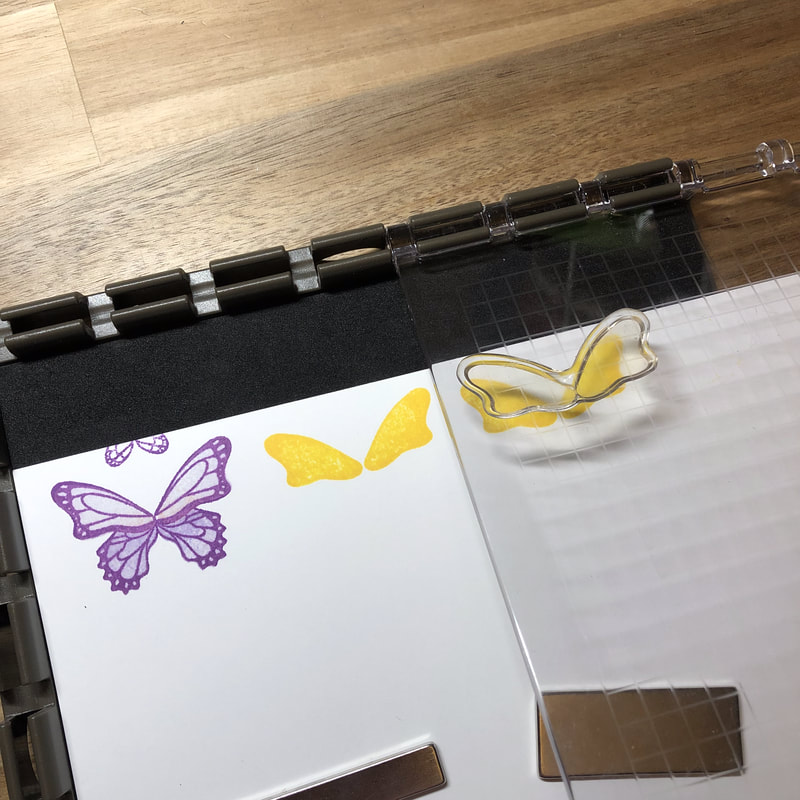
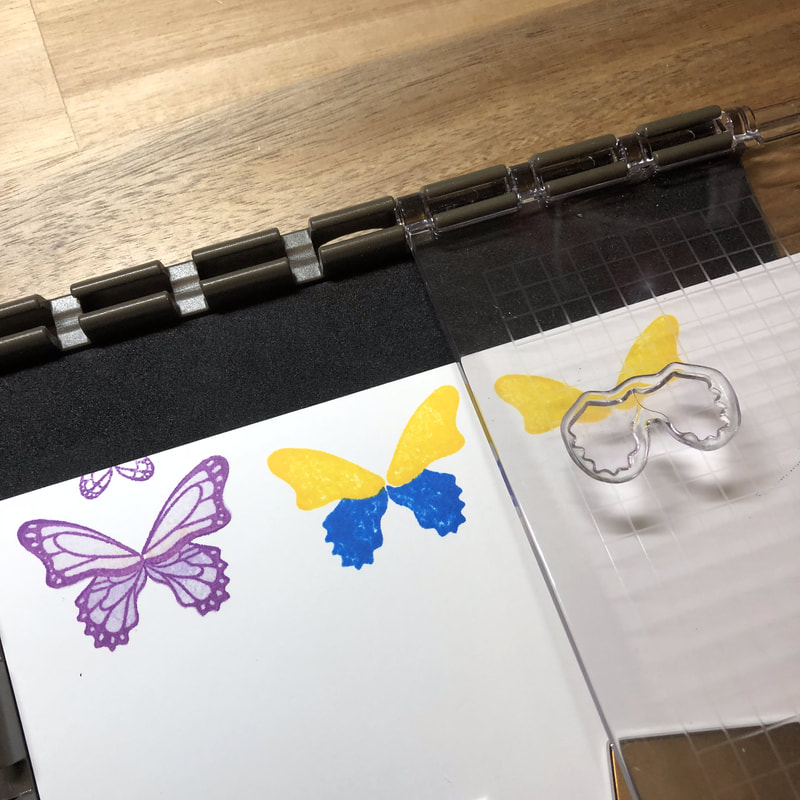
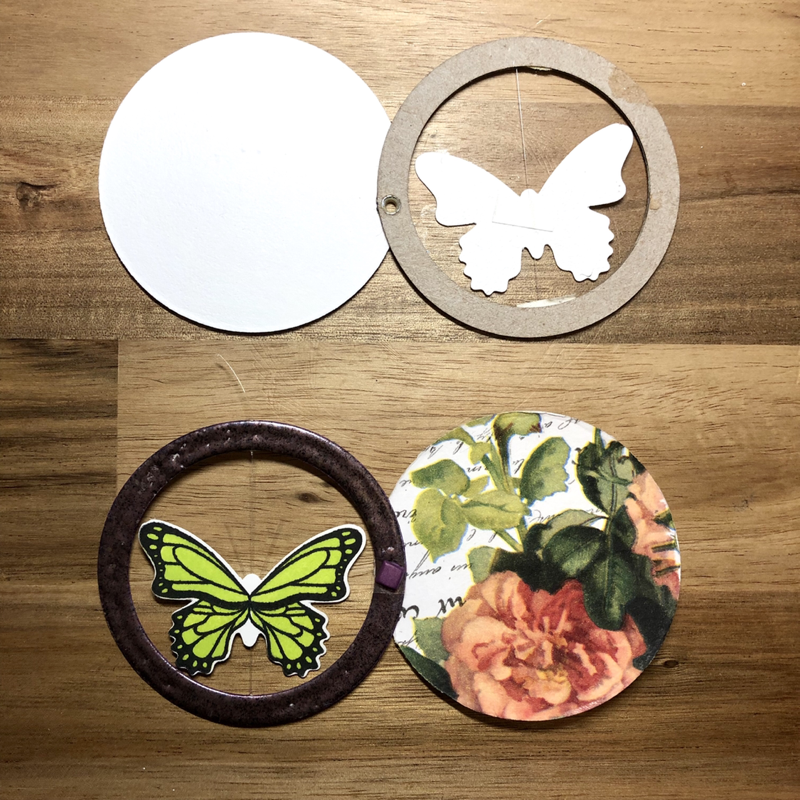
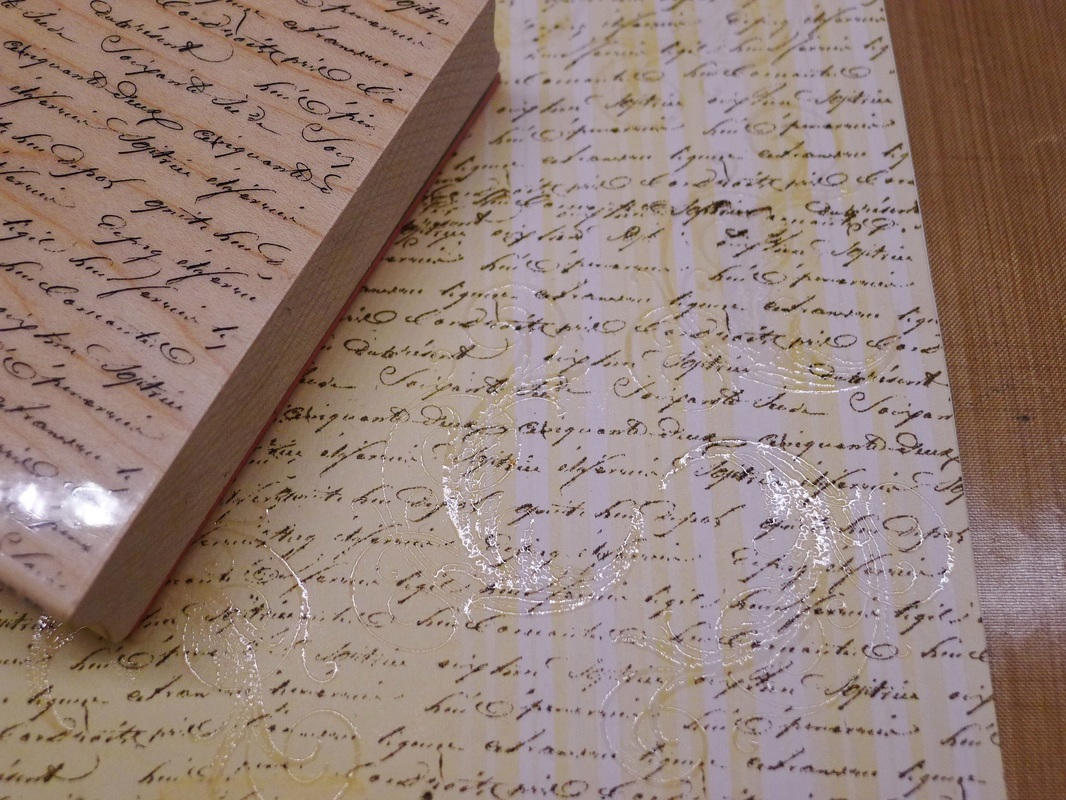
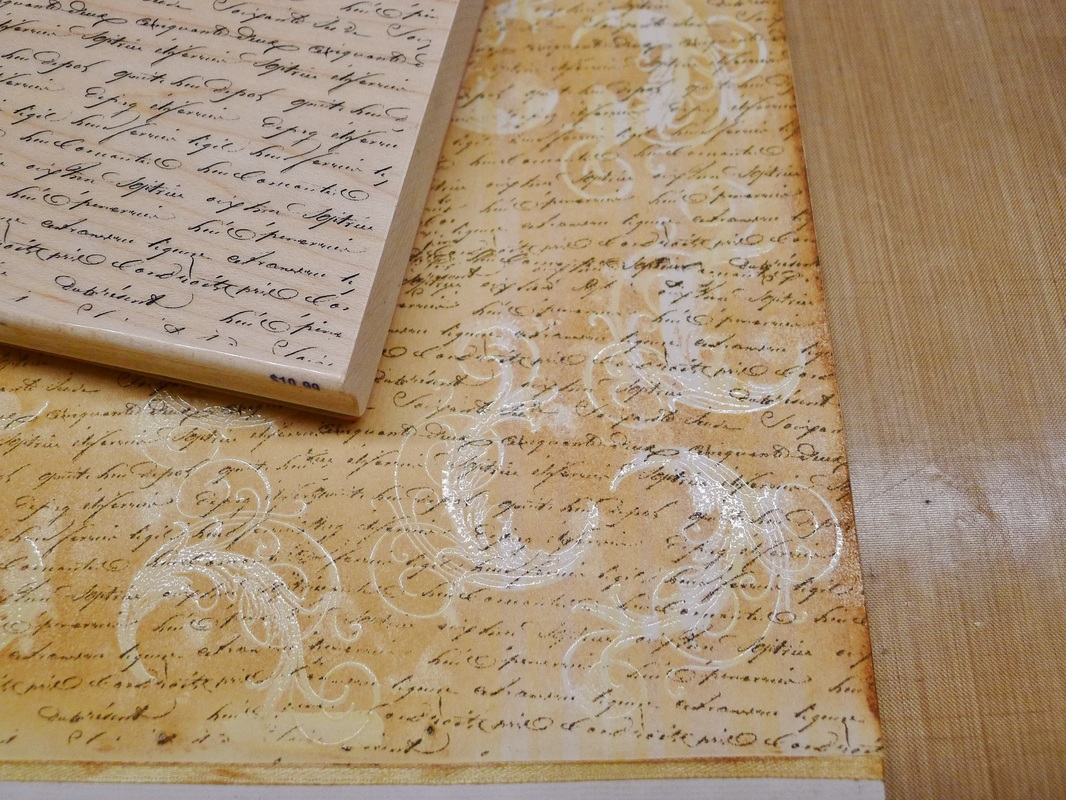
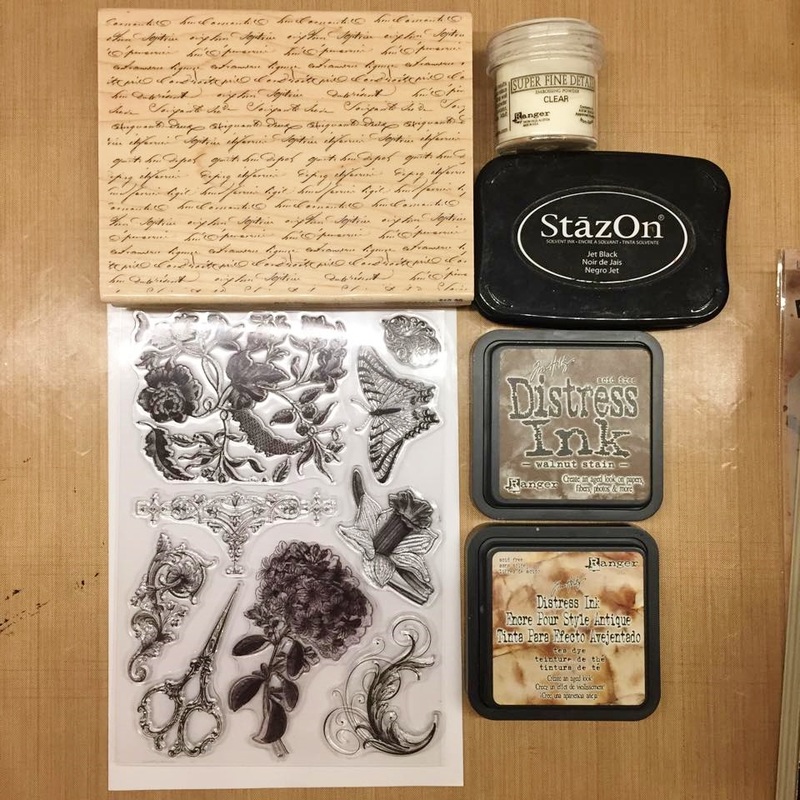
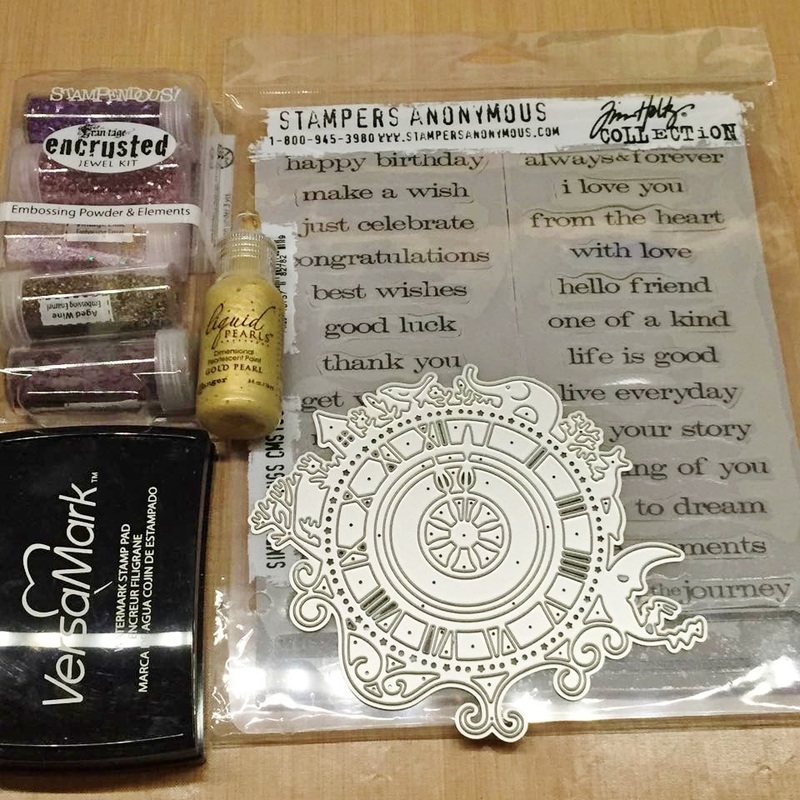
其實這個月的ATC的題目基本上是可以很容易發揮的因為是無題自由發揮但尺寸卻非常具有挑戰性。這一次所要求的尺寸是圓形而且只有2.5吋是現在相當流行的Artist trading coin。在收到這個題目之前我就一直很想做一種會動的剛好就直接用在這次的題目上。會不會太小?不好發揮?是有它的挑戰性但做了就對了😆因為挑戰成功收到的滿足感也是極大的啊! ~滿足感爆表的大合照~ 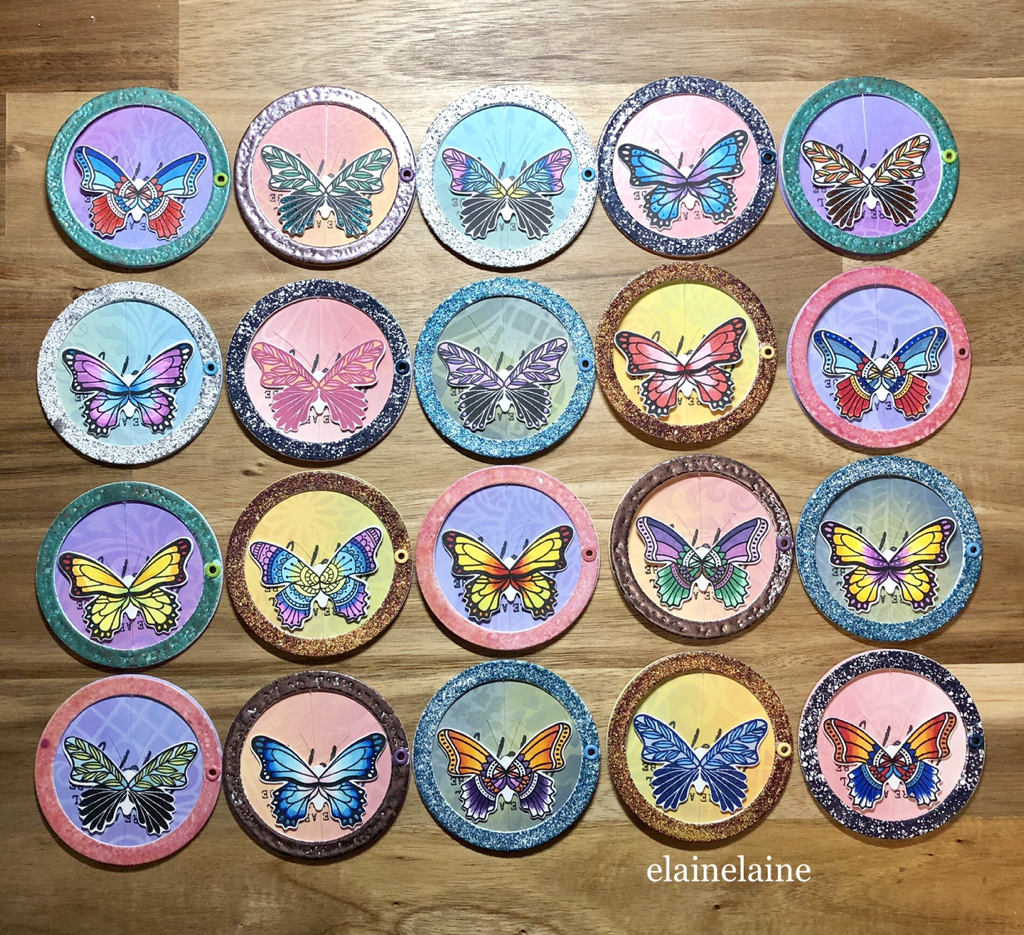 ~圖片分解作法~ 這些是大致上用到的工具:紙張、燙凸粉、柔毛刷、印章、刀模和打洞器。 將切好的圓形用復古氧化印台刷色,再用型板製作花紋。 將事先切好的20個圓圈灑上燙凸粉製作蝴蝶的外框。蝴蝶也上色準備好,再進行圓圈與蝴蝶顏色配對。 將剩餘的20個圓圈⭕️綁上魚線,蝴蝶中心對準魚線貼上蝴蝶再將另一隻蝴蝶貼另一面,之後將凸粉外框黏在白框上面遮住魚線。最後將所有配件用孔眼組合起來。 最後在底座與蝴蝶上下對調的方向蓋上印章。這樣就完工了。灑花~🎉 過程看起來很複雜,其實都是重複動作,做順了還蠻快就完成了😊 ~接下來請大家看影片欣賞~ ~Behind the scene~ 其他氧化印台顏色的組合 這是被我刪除的步驟,做一兩個還好要做20個,layering stamp 太慢了,全部改成手繪比較快。 這是雛形1跟雛形2。1號本來做蝴蝶與字同一方向的,發現在收圈圈時蝴蝶是倒吊的才改成雛形2。 雛形2的底座原本是用紙膠帶完成發現厚度太厚金屬孔眼負荷不了才改成現在的刷色做法。 Art Supplies and material that was used:
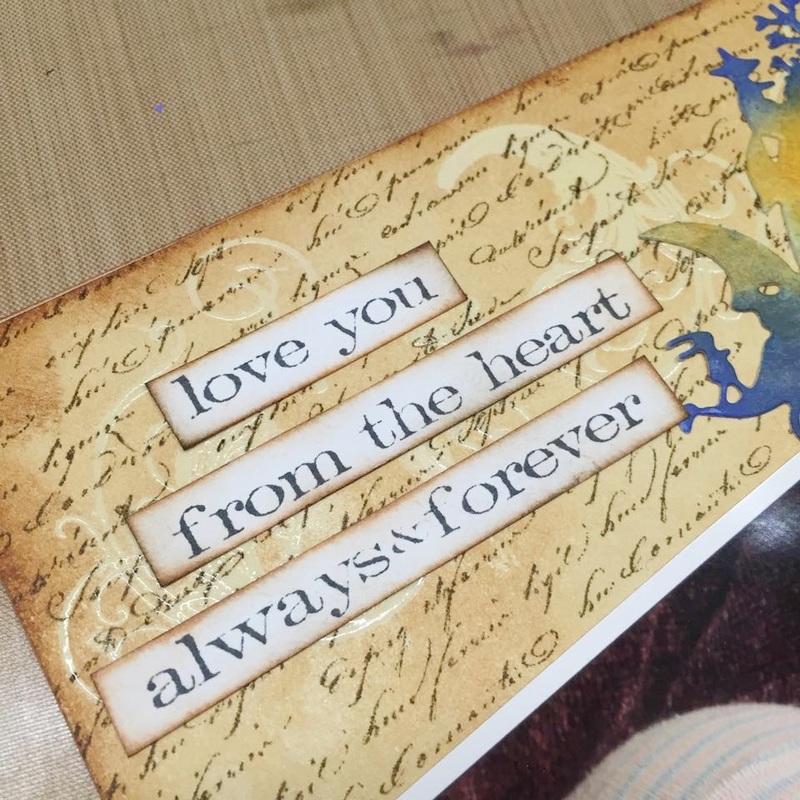
Stampin up Butterfly gala stamp set Stampin up butterfly punch Kaisercraft Miss Betty clear stamps- there are so many beautiful reasons to be happy Tim Holtz distress Oxide ink pad Seth Apter Texture baked embossing powder Emerald creek magical mysteries embossing powder Hero Arts nested frame circle dies My favorite things circle shaker window & frame dies Misti stamping tool 謝謝欣賞~ Thank you for visiting~ Hello there! Spring is just around the corner, the cold snowing winter is about to pass. I know Spring fairy is working hard to bring color to the garden. This is how I picture my garden will be again... full of the vivid color..... all thanks to the Spring fairy, not me. lol So happy to be chosen as a guest designer on Crafting by design for the March 1st anything goes challenge. Today I am sharing one of my favorite stamp and die: Hello Lovely clear stamp set and heartstrings dies. Enjoy~ 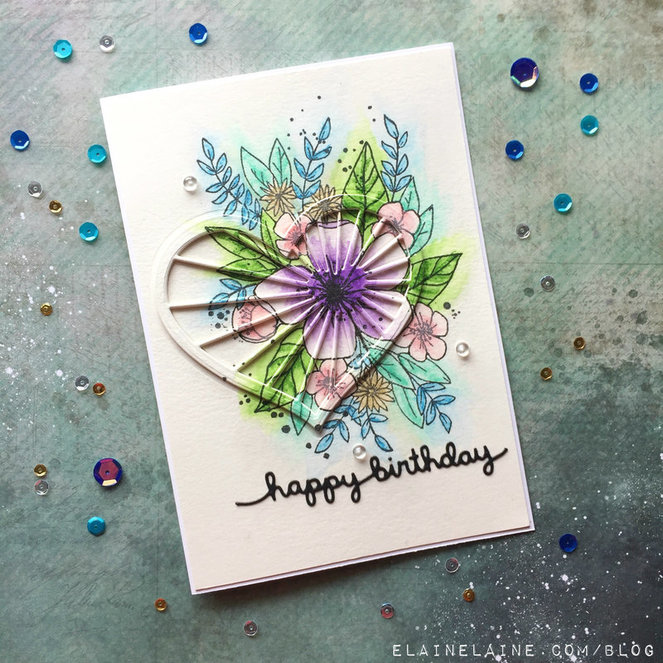 I choose happy birthday sentiment not only to celebrate the start of the Spring season but also to give a shout-out to all the friends and "me" who were born in the month of March. ^^ Happy Birthday~~ <Here are some of the behind the scene photo>
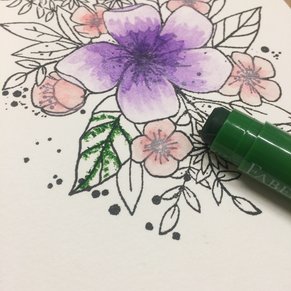
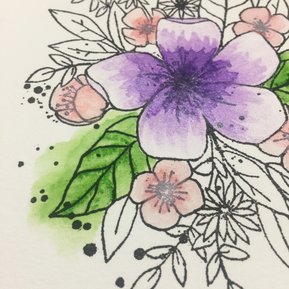
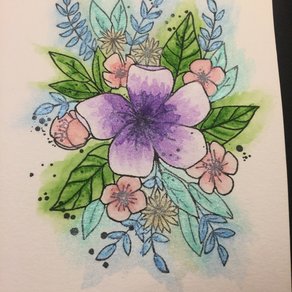
I choose to use Faber Castell Gelatos for it's texture and easy to blend with water. I draw some line on the leaf and use water brush to blend the color, also purposely to leave some texture and bleed outside of line.
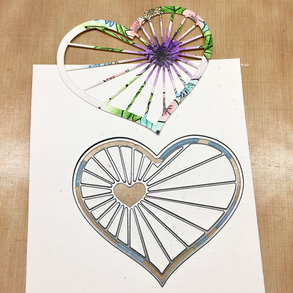
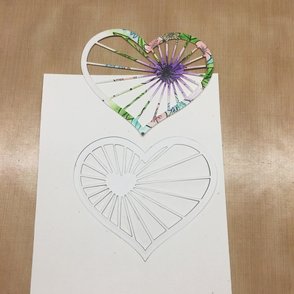
While waiting for the watercolor paper to dry, I die cut few of the heartstrings die from Concord & 9th, these blank die cut will be add it to the card later.
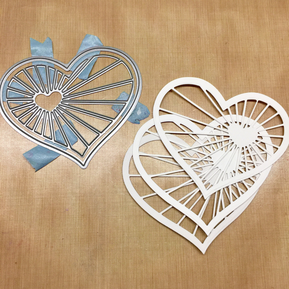
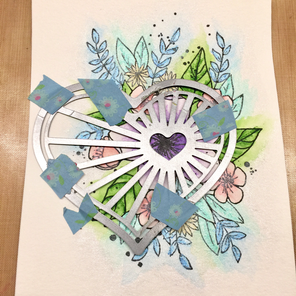
The same heartstrings die again places on the main flower to cut the shape out. Then flip the card over to take out just the outer heart. You can see I put the washi tape on the die to make sure the distance between outer and inner die stay the same through out entire card making process....
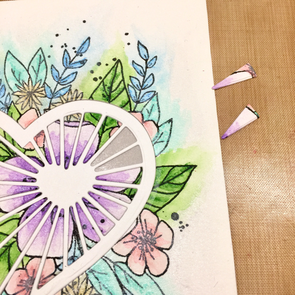
Because of that when I add the blank heart die cut, it will fit exactly into the same space. Once the first blank heart die cut is in place, I seal entire heart with double adhesive sheet to secure every pieces. So when I flip over if any piece fell out(hoping not all of them) I can easily put it back. Luckily when I flip it over , just two pieces are needed to place it back. ^^ With all the pieces in place, the rest of the blank heart die cut is applied with glue and stacked on one by one. The last die cut shape will be placed on the top is the die cut from the original drawing. Lastly adding some embellishment and Happy Birthday sentiment, the card is completed. 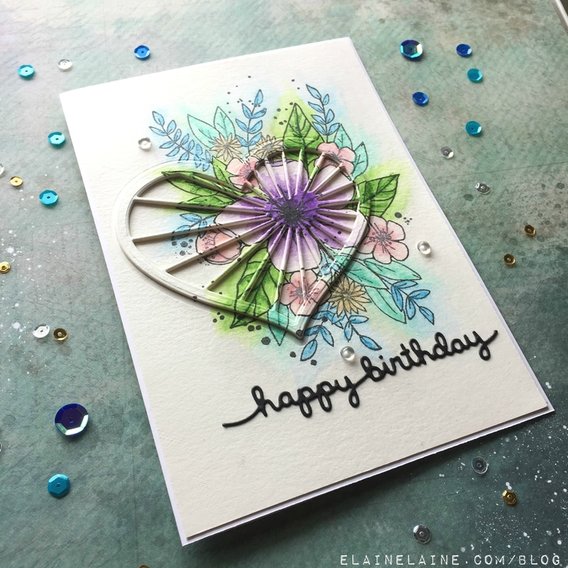 Thank you for visiting my blog~ Happy crafting! Supplies:
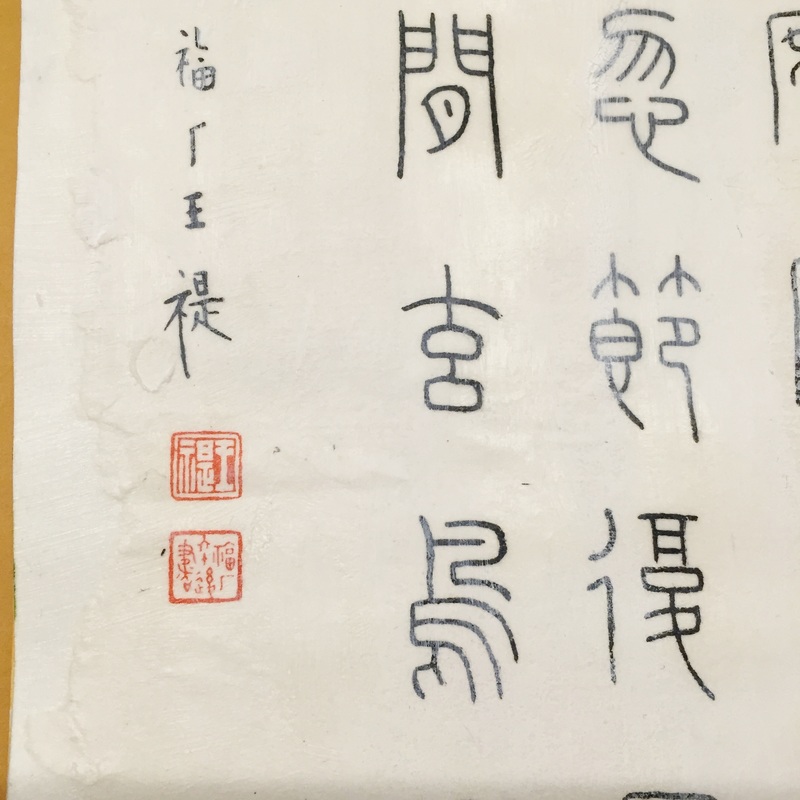
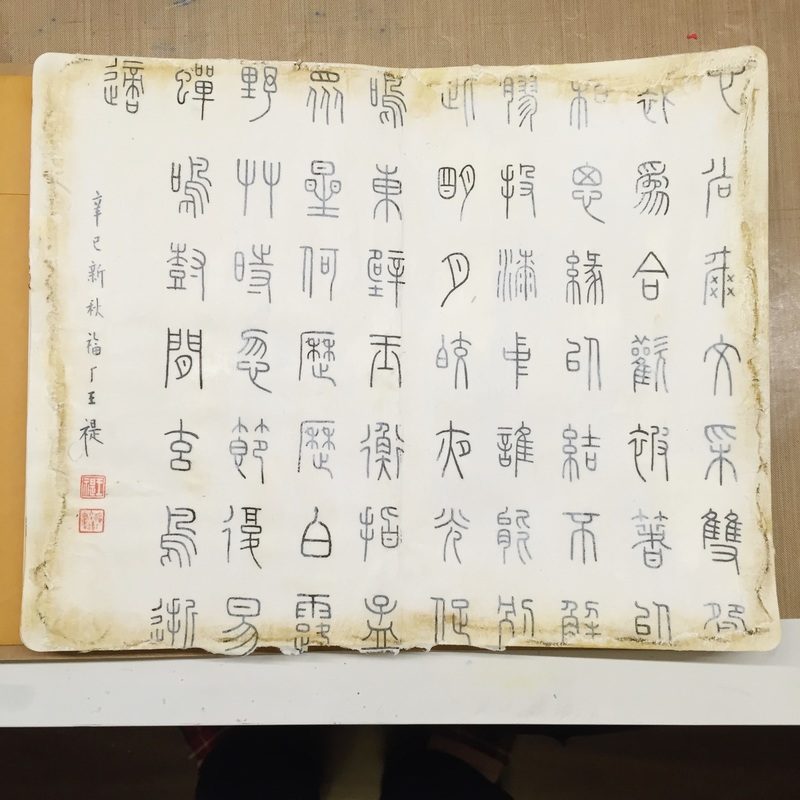
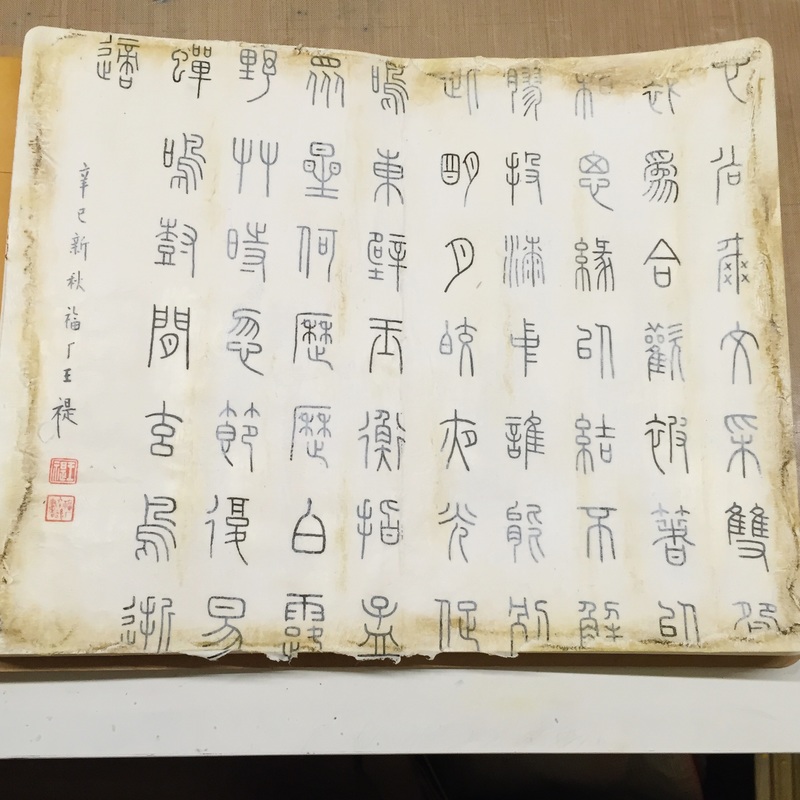
Concord & 9th Hello Lovely clear stamp set Concord & 9th Heartstrings dies Faber Castell Gelatos Lawn Fawn Happy Birthday die I am very fortune to join a group of great racers. In this group Amazing Rae Art Journaling Challenge, racers will create an art journal base on the country. First stop is China. It takes me awhile to decide what I want to do with China. But once I decided, it didn't take much time~ I might add more stuff later but as it for now less is better, from an old Chinese saying. 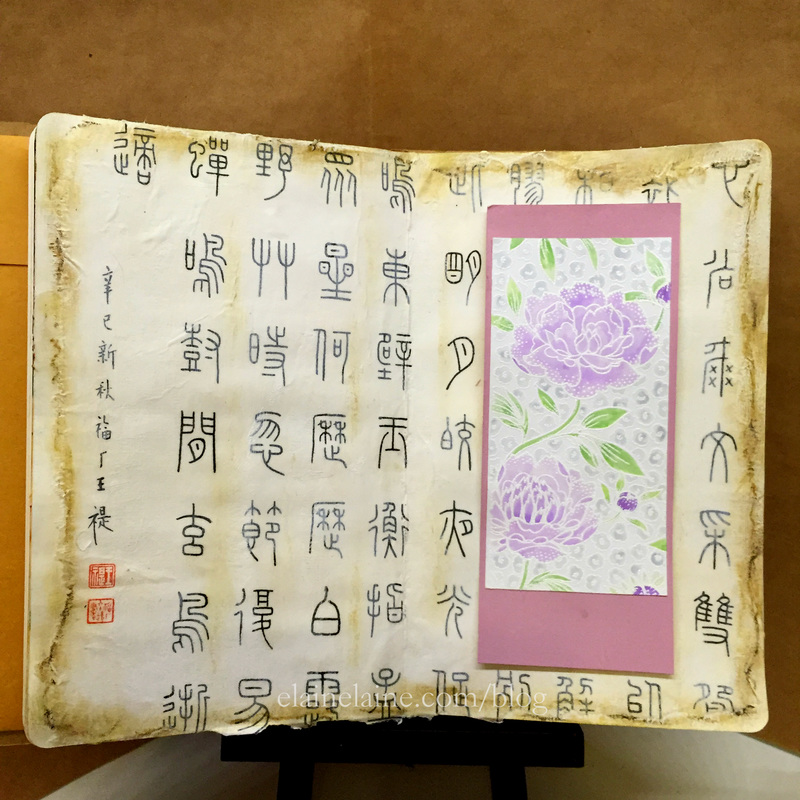 This is a replica of an old Chinese painting that was owned by my father. It happened to have some discoloring and was about to toss into the recycling bin. Hate to see it goes waste, so I save it and hoping I can use it someday. The first stop of the challenge is China which is perfect to upcycle the piece. I brush some water around the edge to help tearing the paper with a more torn look. 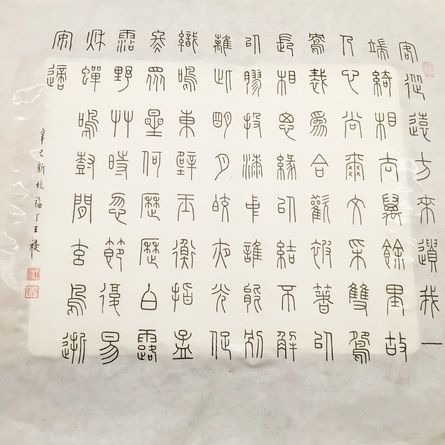 Using gel medium adhesive to the journal and add more gel medium on the top, then brush gesso on entire surface. Then I use baby wipe to wipe away gesso on some characters that I like. So those characters are darker compare to the one cover with gesso. Can you tell which one?
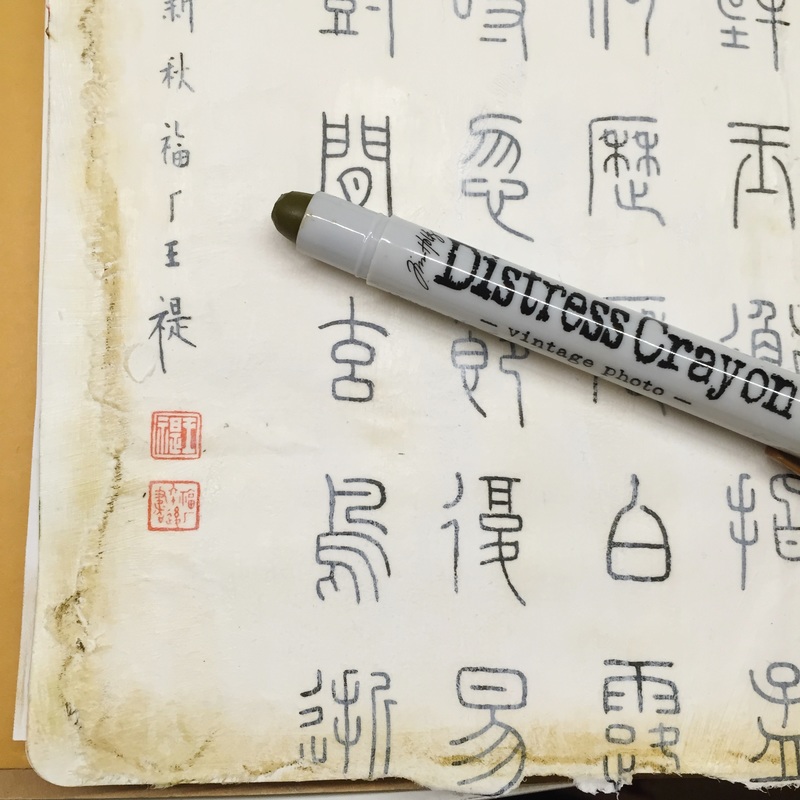
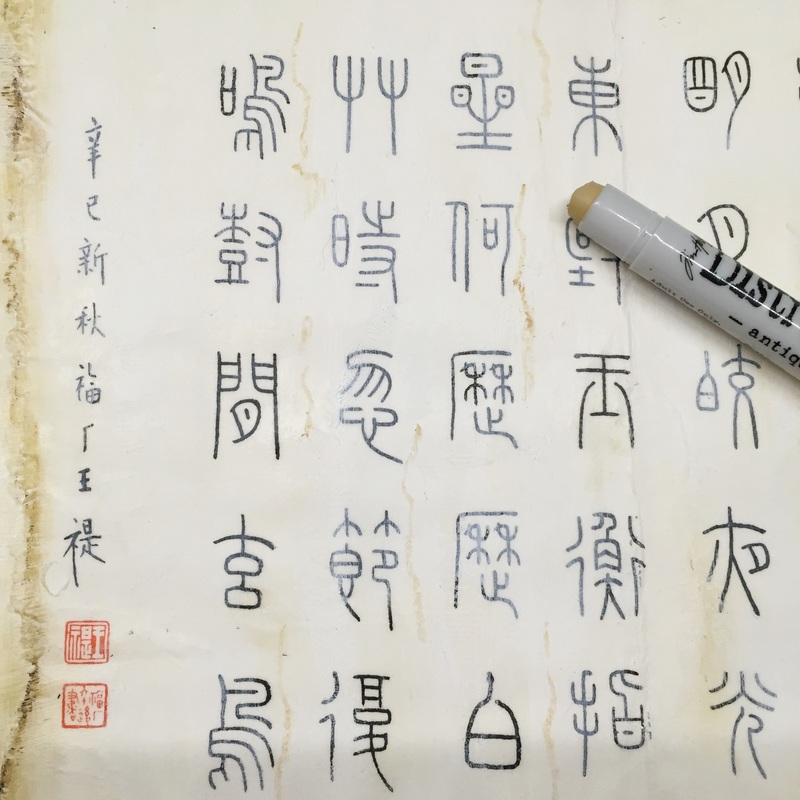
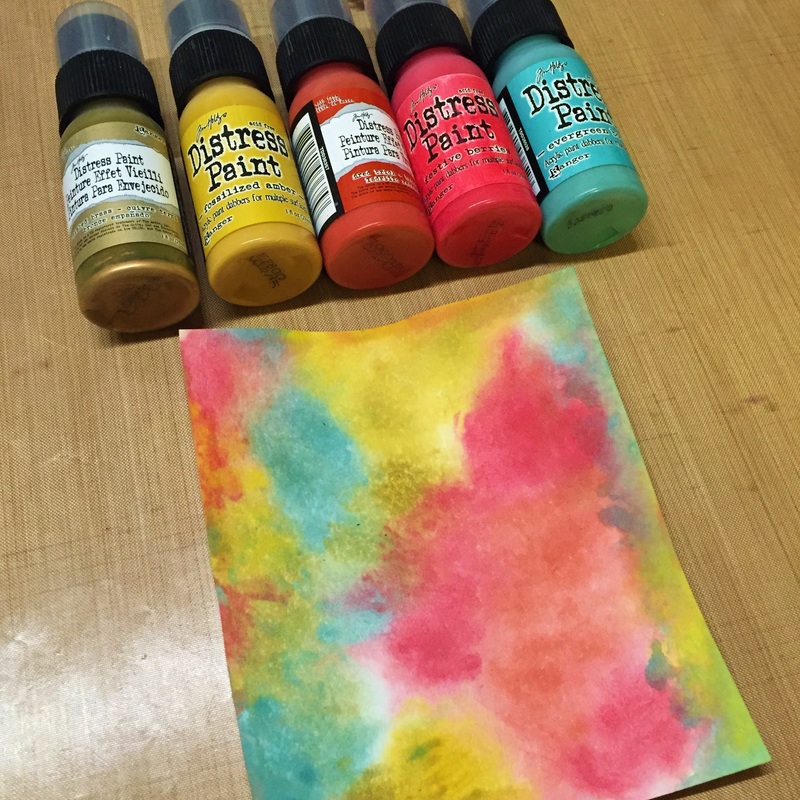
Now work on the edge, I used Tim Holtz distress crayon on the torn area to create an old paper, a burned paper look. I used both vintage photo all around and stain walnut in some area. Just draw a thin line and start rubbing it like crazy.
With old looking edge, the entire page now looks too clean, so I use antique linen to again draw some line next to the characters and blend it out quickly. Distress crayons is hard to rub or blend once it is dry. So if you let it set for too long, it won't blend nicely and the line will stay as is unless to reactive it with water.
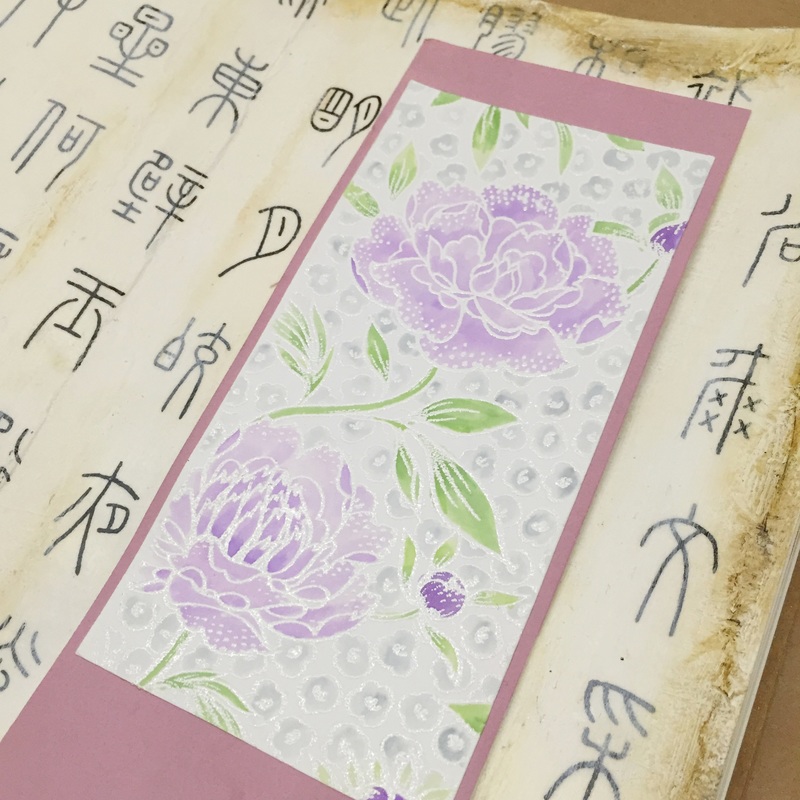
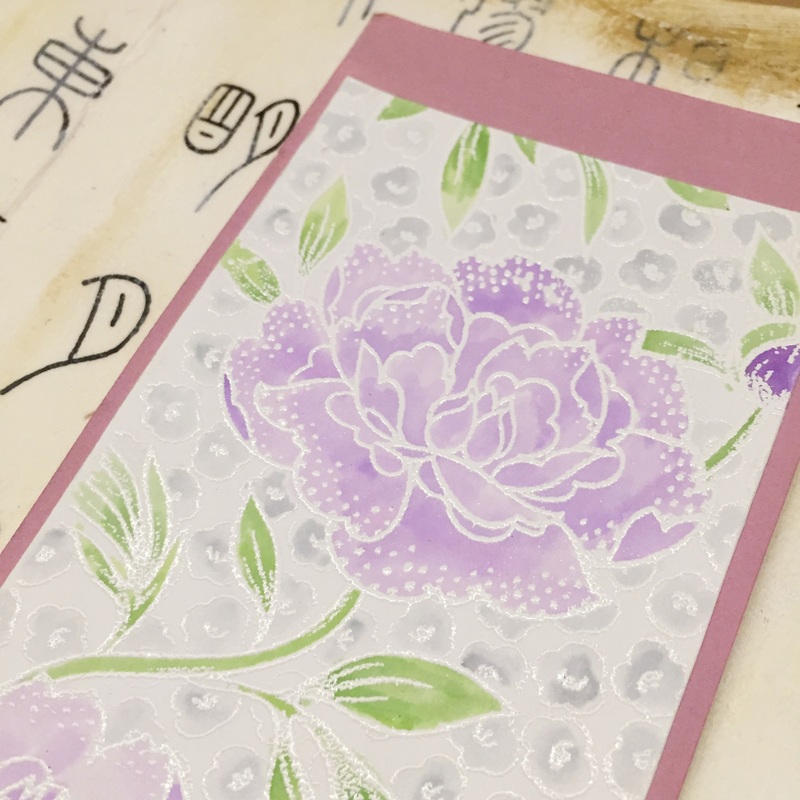
I choose floral as center piece and I want it to look like a Chinese floral painting, so I cut a piece of pink card stock adhesive behind the flower purposely leaving the bottom more pink cardstock than the top. So in a way it is a Chinese painting without scroll. lol The flowers are embossed with white embossing powder then paint it with distress ink.
The Final Piece 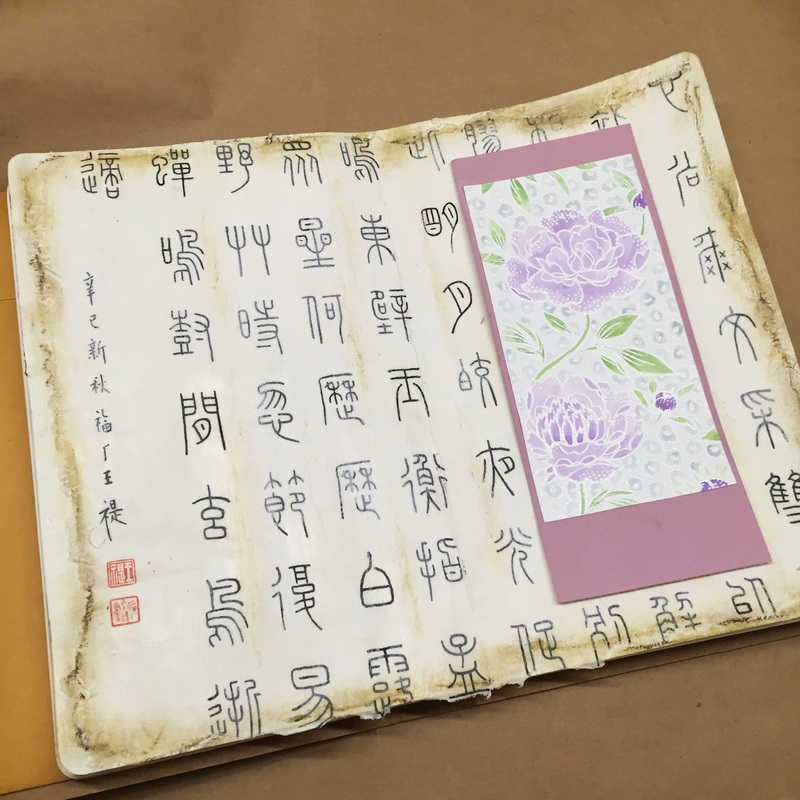 Thank you for visiting my blog~
Stay tune for the next stop for this Amazing Race Art Journaling Chanllenge. I have been thinking about a spring like card for awhile. I guess I can't wait for Spring to come. Think of this as a universal card that whoever receive this will also get a feel of Spring~ 這次選擇綠色當背景,可以感受到春天一整片綠油油的草地,不時可以看到一叢一叢的小花努力的綻放著。現在想想最後一次躺在草地上是N年前了,下次有機會一定去享受一下大地之愛~ 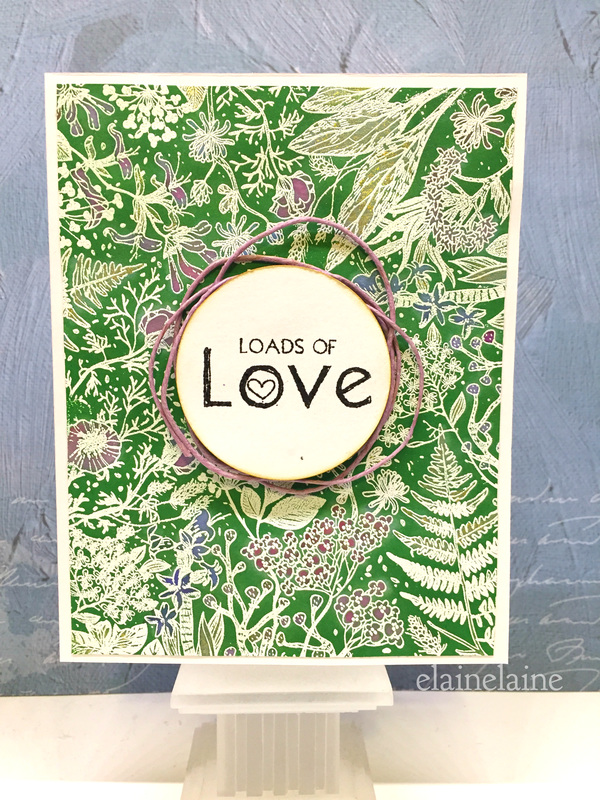 ~~The Detail~~ 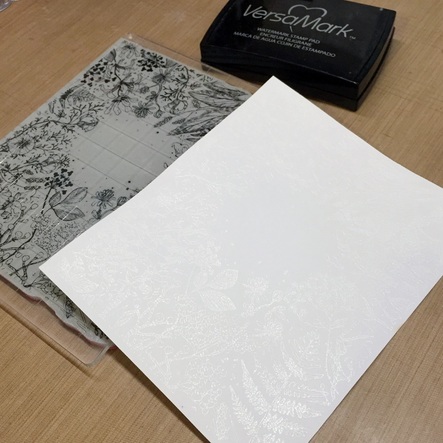 I used Tim Holtz Botanical Sketch stamp, VersaMark watermark stamp pad and white embossing powder to create the background. I use Ranger white super fine detail embossing powder which is needed for such detailed fine line stamps. I will explain more in a different post. You will be able to see the comparison. 簡單又效果極佳的方法~草皮章,浮水印台加燙凸粉。燙凸粉用的是Ranger極細凸粉,它的細度較適合用在細節多的印章上,在下一篇我會做個燙凸粉普通和極細的比較~ 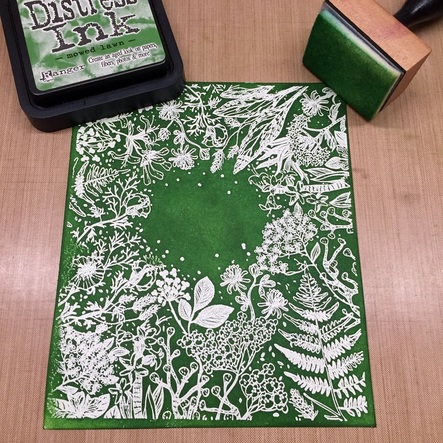 Then using distress ink mowed lawn and blending tool to blend hack out of it. At some point I use the ink pad to simply smear the entire cardstock. :) 用復古印台mowed lawn非常漂亮的綠色,塗満整張紙,真的是死命的塗,顏色越深越好。這樣才可以進入下一個步驟 lifting technique。 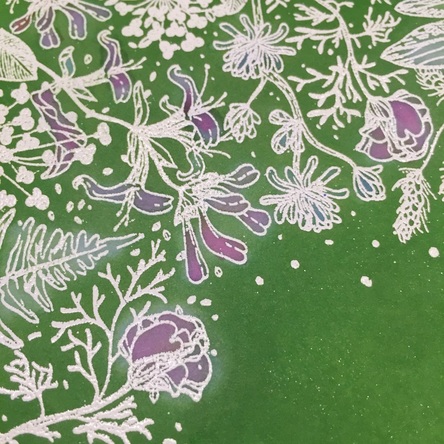 When it is done, I use, lifting technique, just few drops of water to take out some of the color out. I forgot to take a close shot but you can see the fern at the left bottom corner that the color is lighter after few drops of water and before I add different color on it. 用水彩筆沾水滴在花瓣上,綠色就漸漸的變淺,水越多顏色越淺,左邊綠色的葉子是變淺之後未上其他色之前。 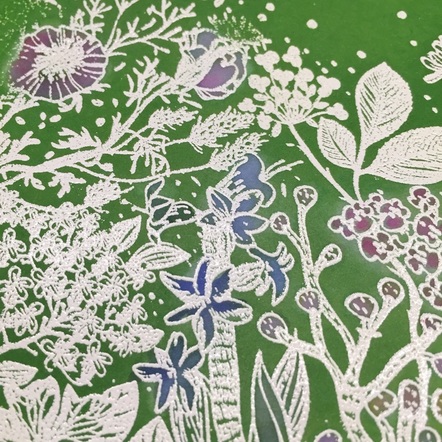 Here I use distress ink picked raspberry ( it turns to lavender color. Nice!)and blueprint sketch for the look. 紫色是用復古印台 pickled raspberry , 藍色是blueprint sketch。上越多顔色越深~ 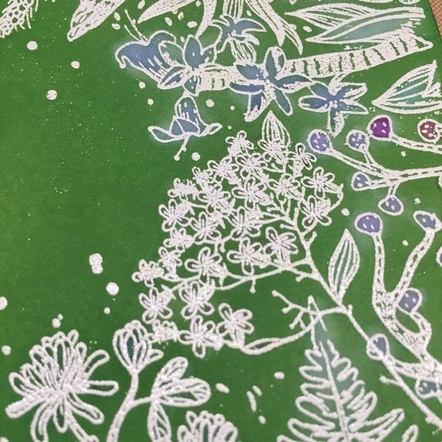 Here again using distress ink blueprint sketch but decided to use lifting technique again to lighten up the blue. 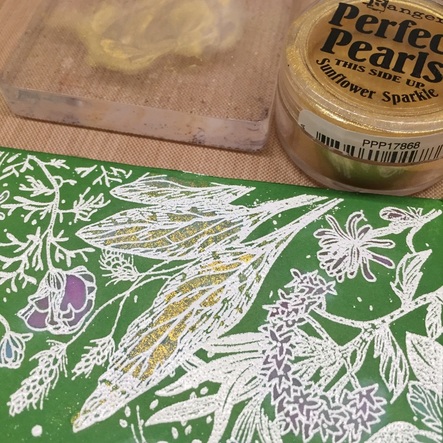 Well green leaves are going to blend into the background so I decide to use some bling bling sunflower sparkle perfect pearls with couple drops of water. 葉子的部分最後決定用Sunflower sparkle 金質粉。讓卡片也有亮亮的感覺~ 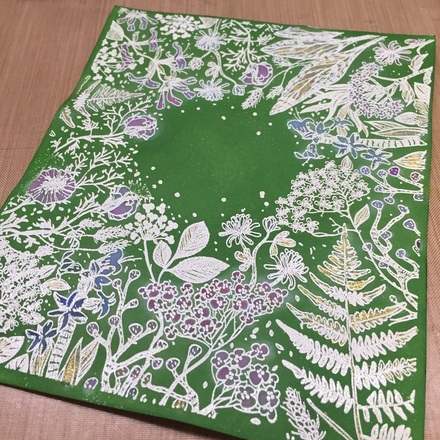 I only want to have few color showing on the card since it is quite busy already. It turns out looking great! 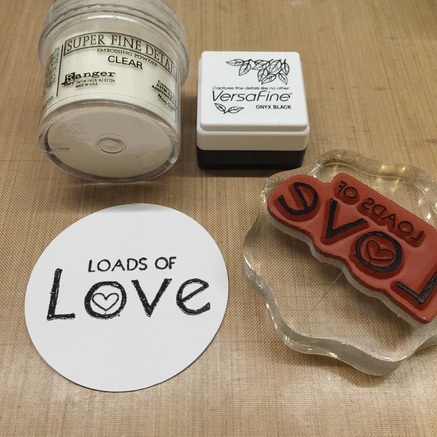 Time to work on the sentiment~ I choose Unity Stamp Loads of love for this card. In addition, I gently brush around the edge using distress ink tea dye then spritz some perfect pearls water to get that shimmer look. 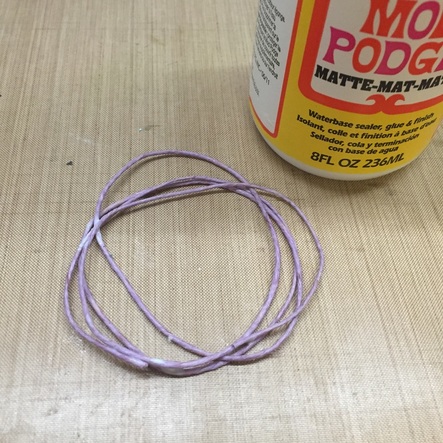 I got this twine from a second hand store was going to use for book binding but color is perfect for it. I had learned a trick from YouTube to coat it with mod podge or multi medium first, it is actually must earlier to form the circle that I wanted. 有時候線或麻繩很不受控制,可以先整條塗上一些mod podge或其他種類的膠,再塑形比較容易。 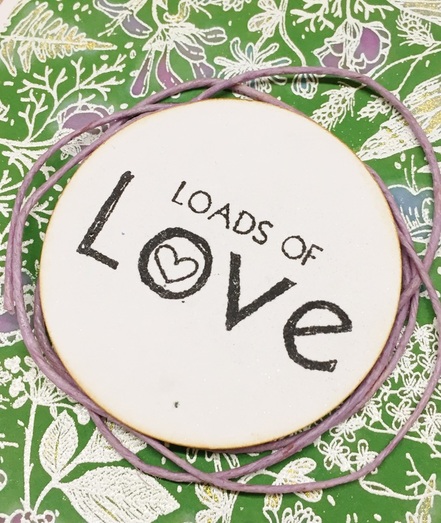 The sentiment is a bit small when I lay it on the card and I don't want to add a second layer because it will block out more background so a few loops of wire or twine will help with the illusion. 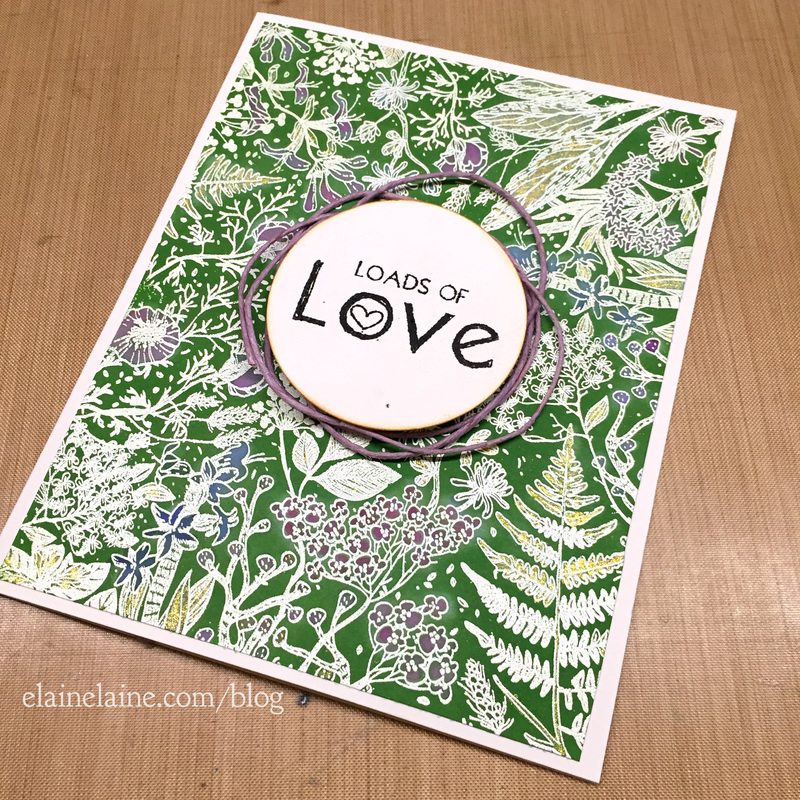 Here is the finishing piece! Hope you enjoy and thank you for visiting my blog~ Supplies: Tim Holtz Cling Stamp Botanical Sketch CMS216 Distress ink pad mowed lawn, picked raspberry and blueprint sketch VersaMark watermark stamp pad Versafine onyx black Ranger super fine detail embossing powder in clear and white Ranger perfect pearls- sunflower sparkle Unity stamp- Loads of love Enter this card into the following challenges:
Simon Says Stamp Wednesday Challenge Anything goes Crafting from the heart challenge #100 Penny's paper crafty challenge #266 Anything goes Craft your passion challenges #300 Anything goes Crafting With Friends Challenge #15 Anything goes We all have a moment of needing something quick, a quick get away, a quick coffee break, a quick nap, a quick meal. This time I need a quick card. A quick card doesn't mean not putting too much thought into it. A quick card simply means a quick made card. Lol~ I had this design in my head for weeks already, just didn't find the time to execute it. Why did I say I need a quick card? It actually has a purpose. Just like a quick get away, a quick coffee break, a quick nap or a quick meal, a quick card can make me rejuvenate again or shall I say it is a boost in a way. I am sure everyone has its own way of getting a boost. What is yours? 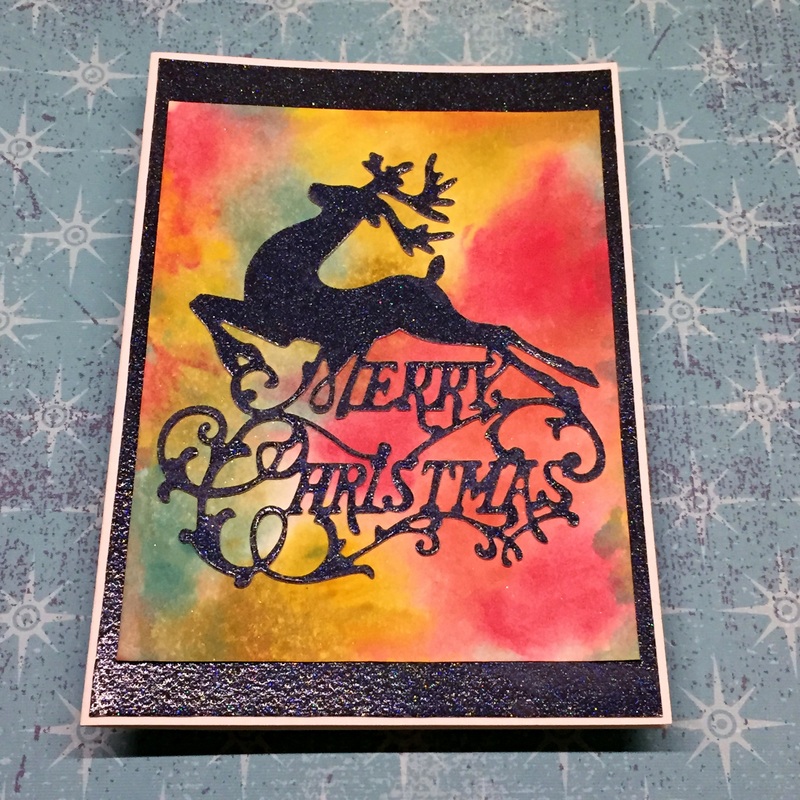 <Details>
 Supplies:
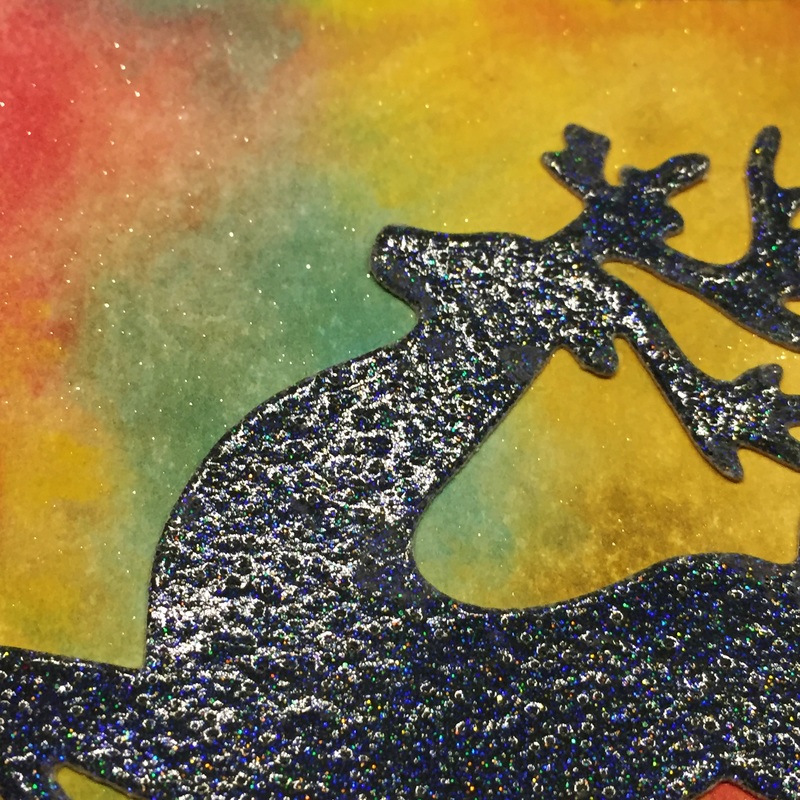
Distress paint- fossilized amber, fired brick, festive berries, evergreen bough Merry Christmas deer die Hero Arts Ombre pool to navy Stampabilities- IR1038 Bright with promise-Merry Christmas Saying Imagine Crafts Pssst Sheer Shimmer Spritz White cardstock shimmer navy glitter card stock Hello Crafter~ I am sure many folks out there are just like me. I save all the scrap papers because you will never know when you need that piece of paper. With tones of scrap paper on my desk, I decide to make a quick and easy card. A perfect holiday card was born~ Hope you like it! 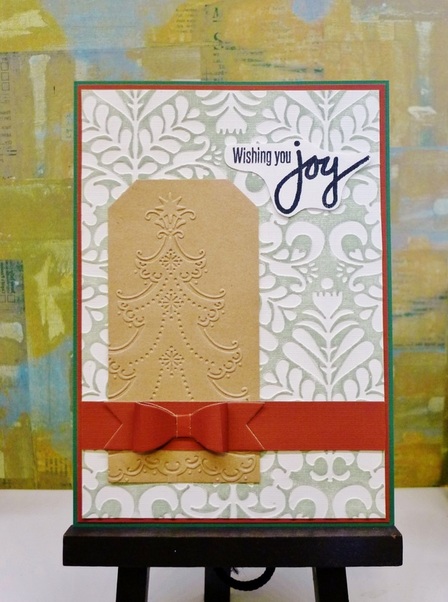
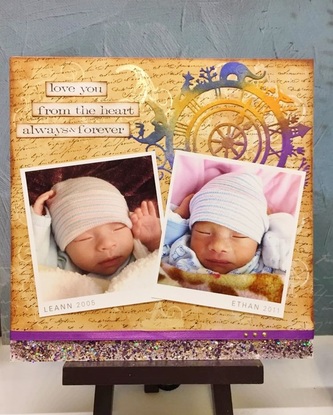
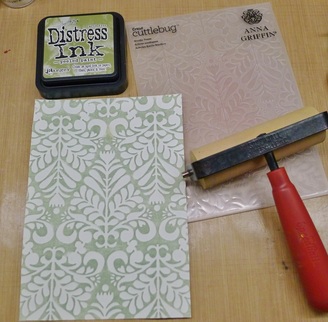
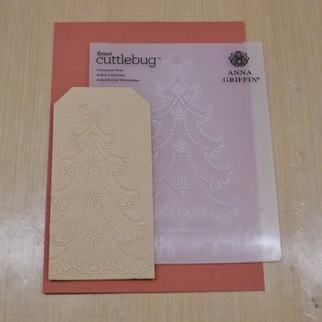
Supply: Cuttlebug embossing folder-Anna Griffin Nordic Tree Cuttlebug embossing folder-Anna Griffin Victorian Tree Tim Holtz Distress Ink-Peeled Paint Hampton Art-Jillibean Soup Handwritten Sentiment Stamps jb0198 Little B-Box & Bows Cutting Dies Cardstock in white, green and red Enter this card into the following challenge: Simon Says Stamp Wednesday Challenge! Christmas Scrapping4funChallenge #54 Traditional Christmas Colors Craft Your Passion Challenge 288: Always Anything Goes Christmas Cards All Year 'Round November Challenge Penny's Paper Crafty Challenge #254 Anything Goes Thank you for visiting my blog~ Hope you enjoy it! I had my kids baby pictures printed out couple years ago. I always want to put their baby pictures side by side to show you how much they look alike when they were few weeks old. They both like to sleep with their arms up in the air. lol Finally I decide to just do it and not procrastinating... 我們家的2個屁孩嬰兒時的照片,兩個真的很像,尤其是睡姿一定是投降式,洗出來好久了終於趁這機會完成它。  <Details>
 Supplies:
Entering this tag into the following challenges: MHC 魔力手作挑戰 #10 -- Babe(Baby) 寶貝、嬰兒 Simon Says Stamp Monday Challenge: Throwback #101 2014 I ought to use this more! Glitter, embossing powder it is. Thank you for visiting my blog~
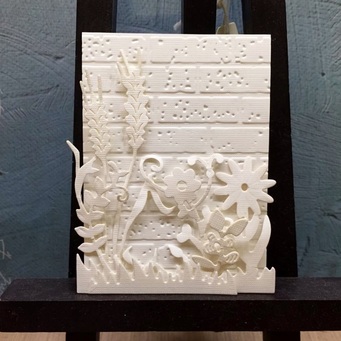
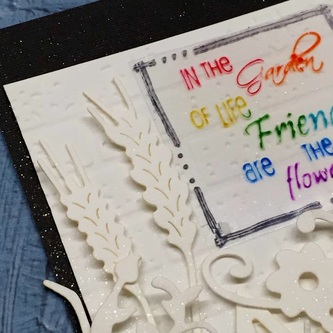
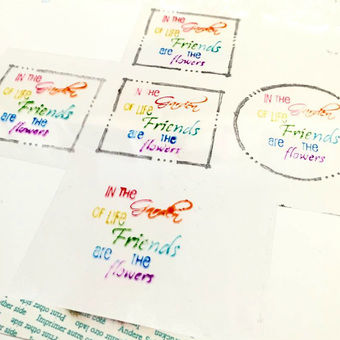
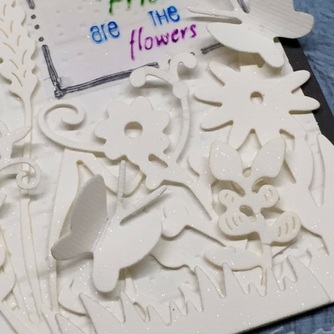
Finally I have chance to post my recent ATC creation. It is a very simple design, basically one brick embossing folder, one stamp and some dies and the outcome is what I am looking. No designer paper, just white on white design with color wording, instant pop on the phrase! Yeah~ 好久沒寫blog 嘞, 有點生疏~ 剛好要試試新買的刀模, 做了張ATC. 果然不同牌子的刀模, 效果特色都不太一樣~ 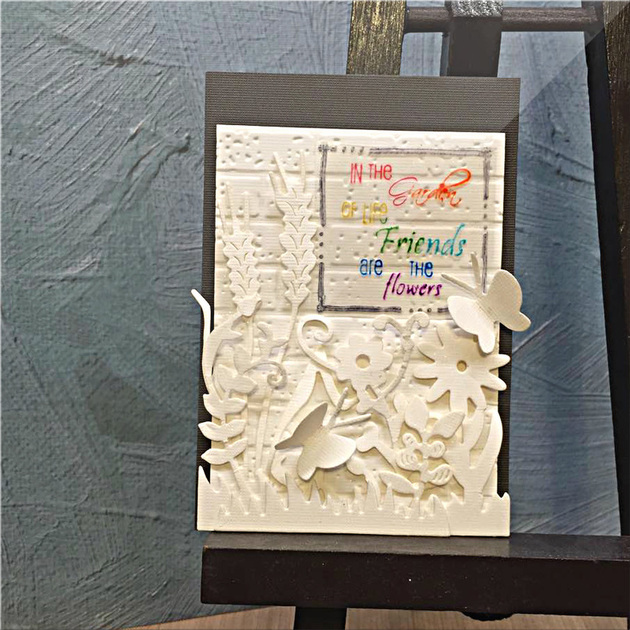 {The Details}
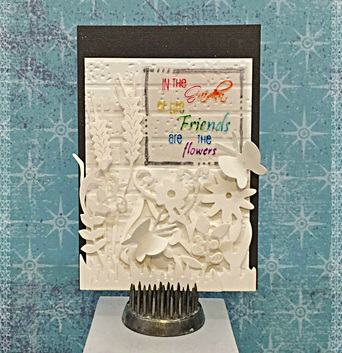 Supplies: DCWV Tattered Time cardstock matstack in texture white and texture charcoal Rubberneckerstamps freehand border phrase set 900 The PaperStudio A2 Bricks Spellbinders shapeabilities die D-lites S2-007 Flower Burst Magnolia DooHickey Club Harvest dies Butterfly and grass die Imaginecrafts pssst! Sheer shimmer spritz-sparkle Entering this tag into the following challenges: SimonSaysStamp Wednesday Challenge No Designer Paper #283 Scrapping4funChallenges #50 Spring or Autumn #33 MHC 魔力手作挑戰 #9 彩色文字
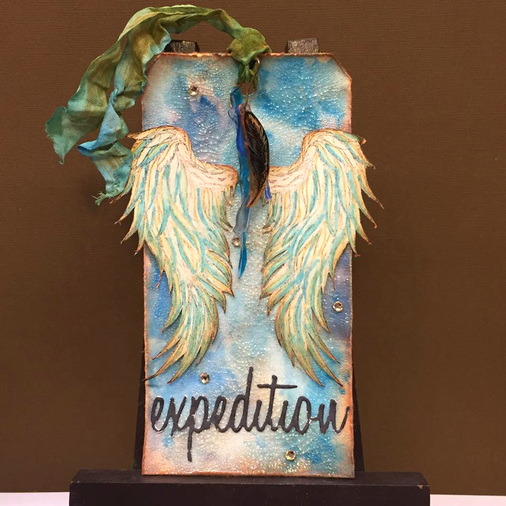
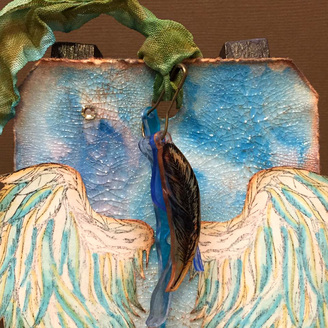
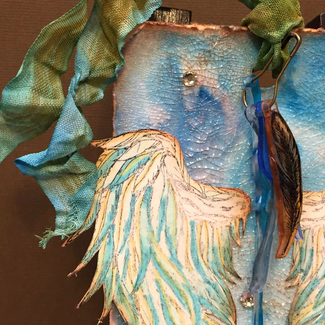
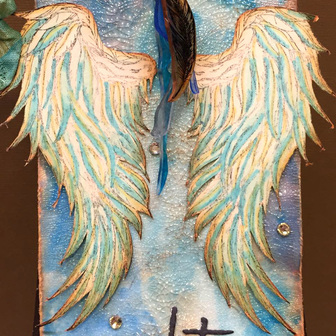
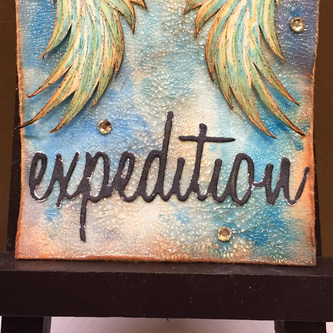
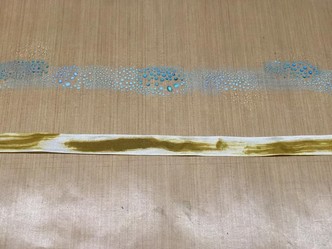
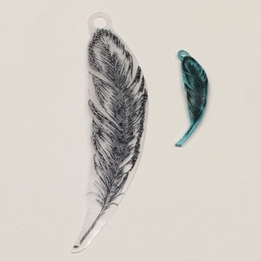
I can't believe we are approaching the fifth month of 2015 in few days~ Today I have finished a tag using one of my favorite things-wings. It is a beautiful thing to look at. This time I stamped a feather on shrink film and color it with alcohol marker. Heat it up and it shrunk to a little charm. Nice! I have also used rock candy crackle paint and distress paint to create this texture background. It turned out great! Love it! 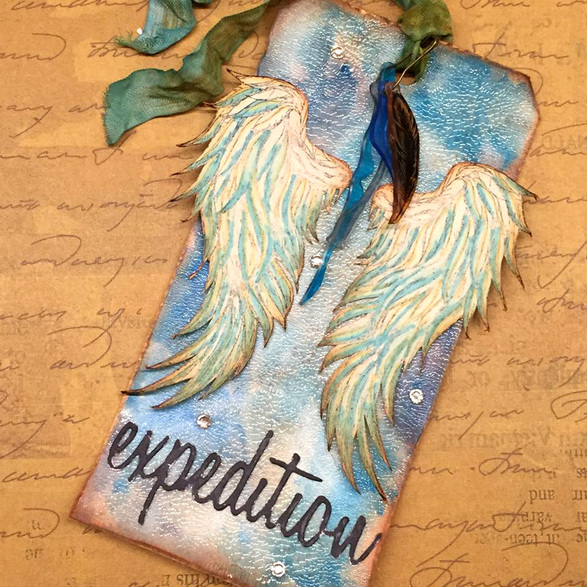 <The Details>
 Supplies:
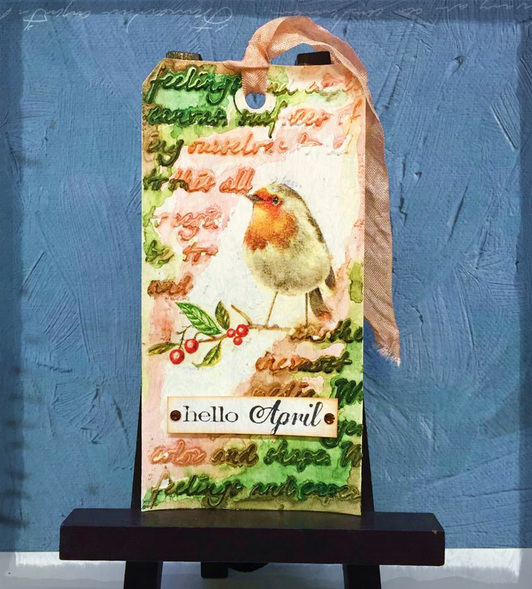
#8 manila tag Staz on ink black Sizzix thinlits Tim Holtz alterations adventure die Stamp: Sheena by Douglass A little Bit Sketchy-Divine Inspiration Ranger rock candy crackle paint Tim Holtz distress paint: broken china, salty ocean, stormy sky, mermaid lagoon, trnished brass Tim Holtz distress ink pad: tea dye Tim Holtz paper distresser Ranger heat tool Shrink film Spectrum noir alcohol markers Entering this tag into the following challenges: Simon Says Stamp Wednesday Challenge Anything goes! #90 MHC 魔力手作挑戰 #4 -- 賓果題 1 #44 Addicted to Stamps and More! Challenge #142 Make Your Mark #32 Crafting by Designs: Month-Long Anything Goes in May! #13 Spring is one of my favorite seasons of the year! Flowers blooming~ Birds chirping~ Wind gently blowing~ and pollen, too. Lol here goes my allergy attack. That's why I stay home more to make cards and tags. ^^ 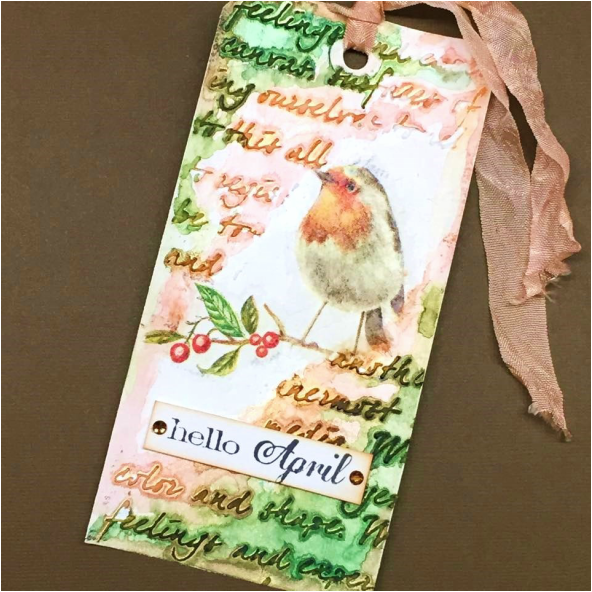 <<The Details>>
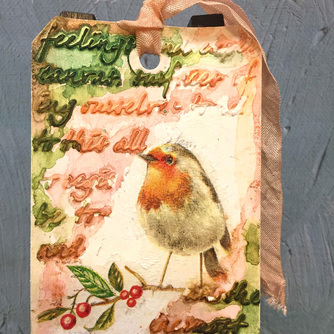
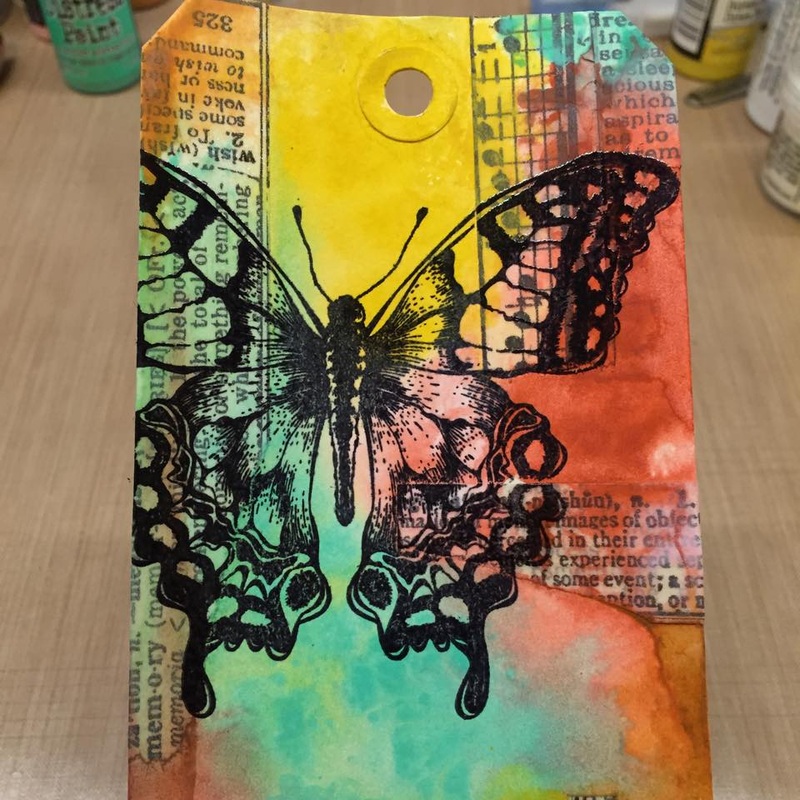
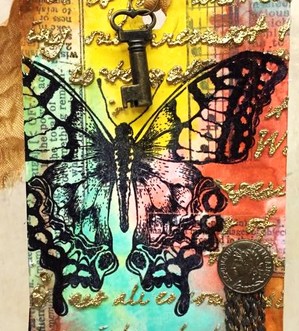
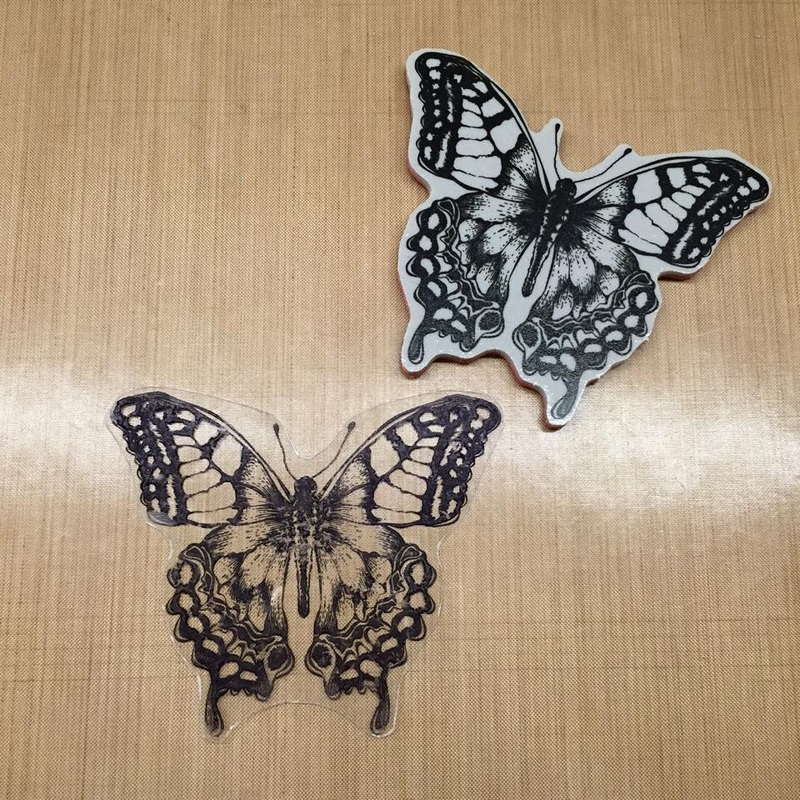
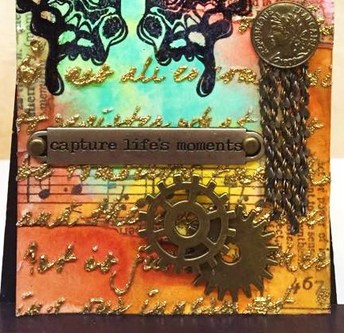
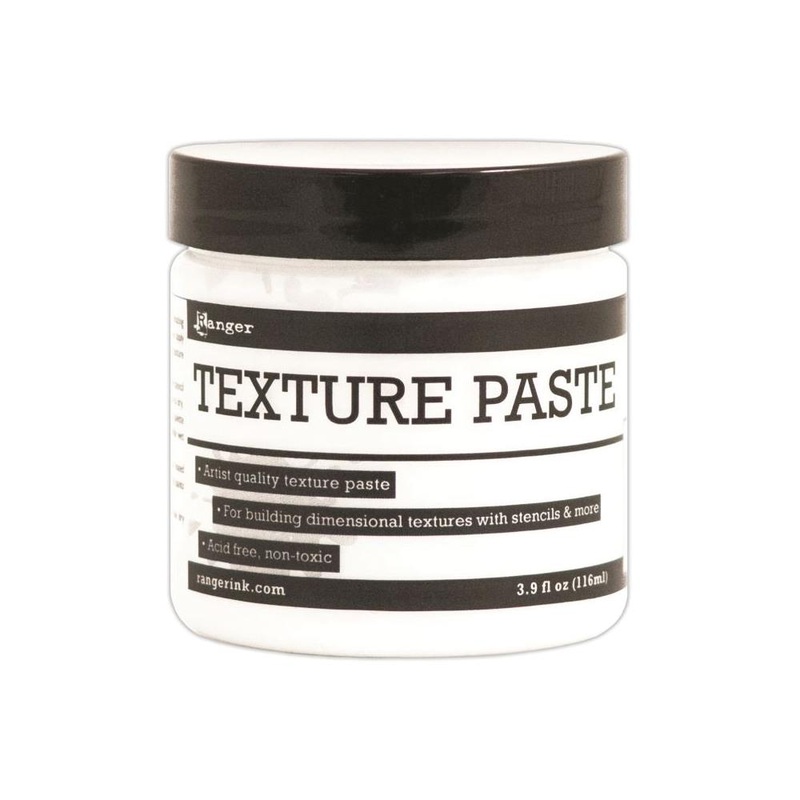
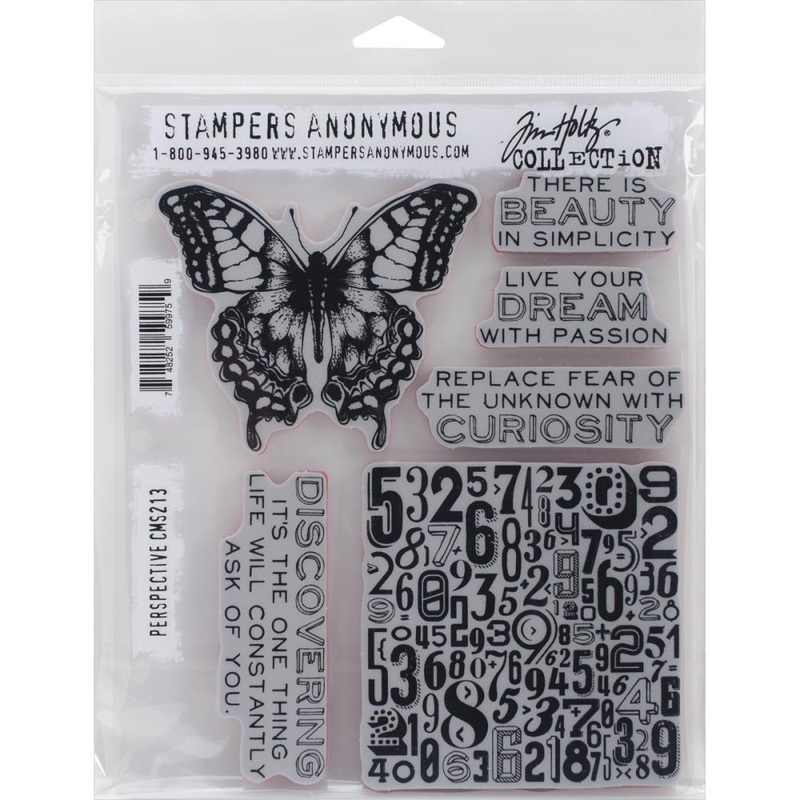
 Supplies: #8 manila tag Lindy's Stamp Gang starburst spray: Sea mist green; Glory of the seas gold; Cocklebells coral; Lucky Shamrockgreen; Opal sea oats Ranger archival ink: jet black Staz-on black Ranger texture paste: regular opaque Ranger multi medium matte Stamps/stencil: CMS155 simple sayings, TCW261s mini art is Napkin with bird image Ribbon & rhinestones Entering this tag into the following challenges: More Handmade Challenge 魔力手作挑戰 Scribble and Scrap Challenge #42 - Always Anything Goes #126 Creative Moments Challenge 66 Anything Goes/Spring or Easter #19 Thank you for visiting my blog~ As usual, Tim has created an amazing tag for March~ With new paint cracked pistachio and new stamp CMS213 perspective, the tag is fun and colorful to look at. To see Tim's March Tag tutorial, you can click on the link here: http://timholtz.com/12-tags-of-2015-march/ Here is my take on 12 Tags of 2015-March. The detail of butterfly is so pretty, truly capture life's moments. The background color is inspired from this amazing nature photo that I found on Pinterest, you can see my inspiration of the color here: color inspiration 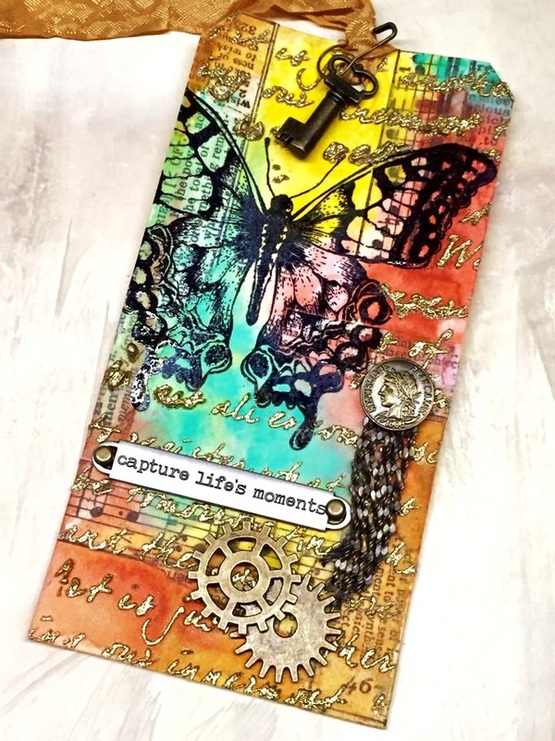
<The details>
Supplies: #8 manila tag, tissue tape Distress paint: cracked pistachio, fired brick, mustard seed, spun sugar, rusty binge, tarnished brass Ranger archival ink: jet black Rangerembossing powders: fine detail clear, fine detail gold Ranger texture paste: regular opaque Stamps/stencil: CMS213 perspective, TCW261s mini art is Staz-on black Entering this tag into the following challenges: Tim Holtz 12 Tags of 2015 March Simon Says Stamp Wednesday Challenge anything goes #812 Thank you for visiting my blog~ Please like me on my facebook page: www.facebook.com
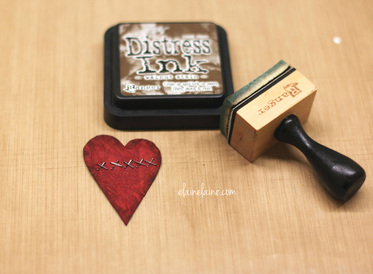
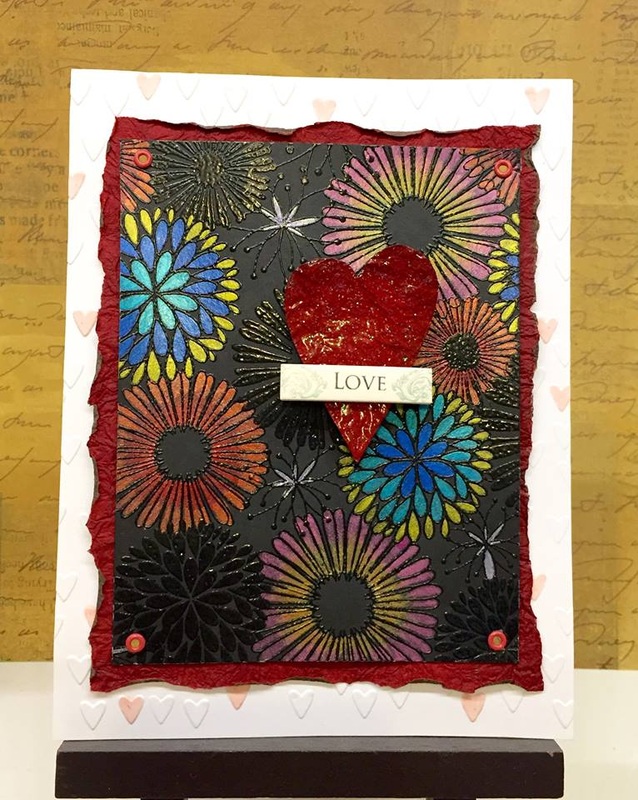 最近好像特別愛用H2O和這個背景章,感覺和什麼題材都很match。參加 MHC 魔力手作挑戰 #2 -- 閃亮亮 ,這次再利用Twinkling H2O,Hero Arts的Everything Flower草皮章和黑色燙凸粉做閃亮背景,上加紅色雙面皺紋紙剪個心型,但感覺有點暗,就加上水晶膠讓❤️也有亮度。最後在底部加紅色皺紋紙以及白色壓凸心型卡紙就完成了。希望在新的一年裡,能夠以一顆熱誠的心面對所有的人事物 , 也希望新的一年像背景一樣閃亮精彩。
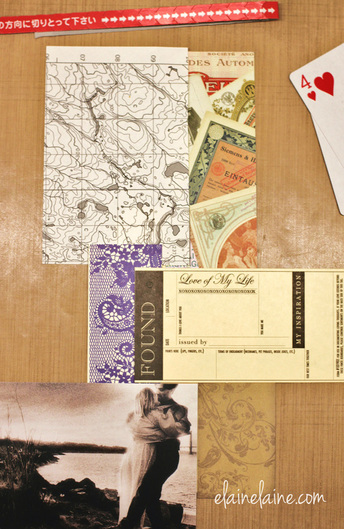
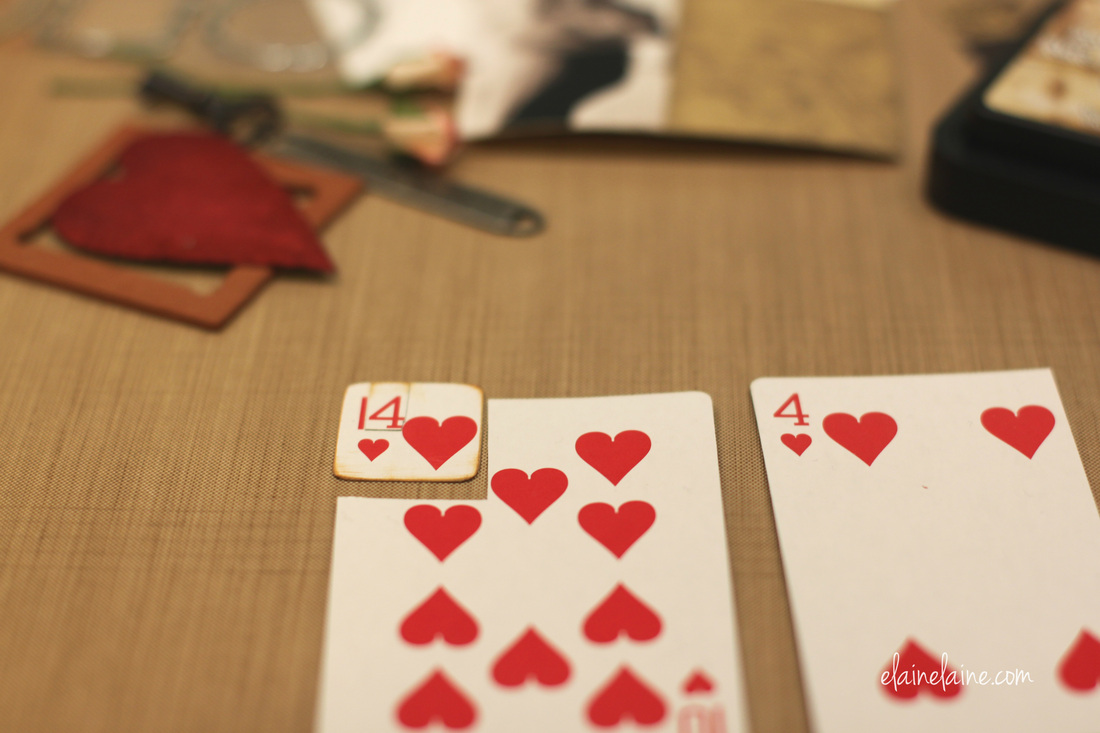
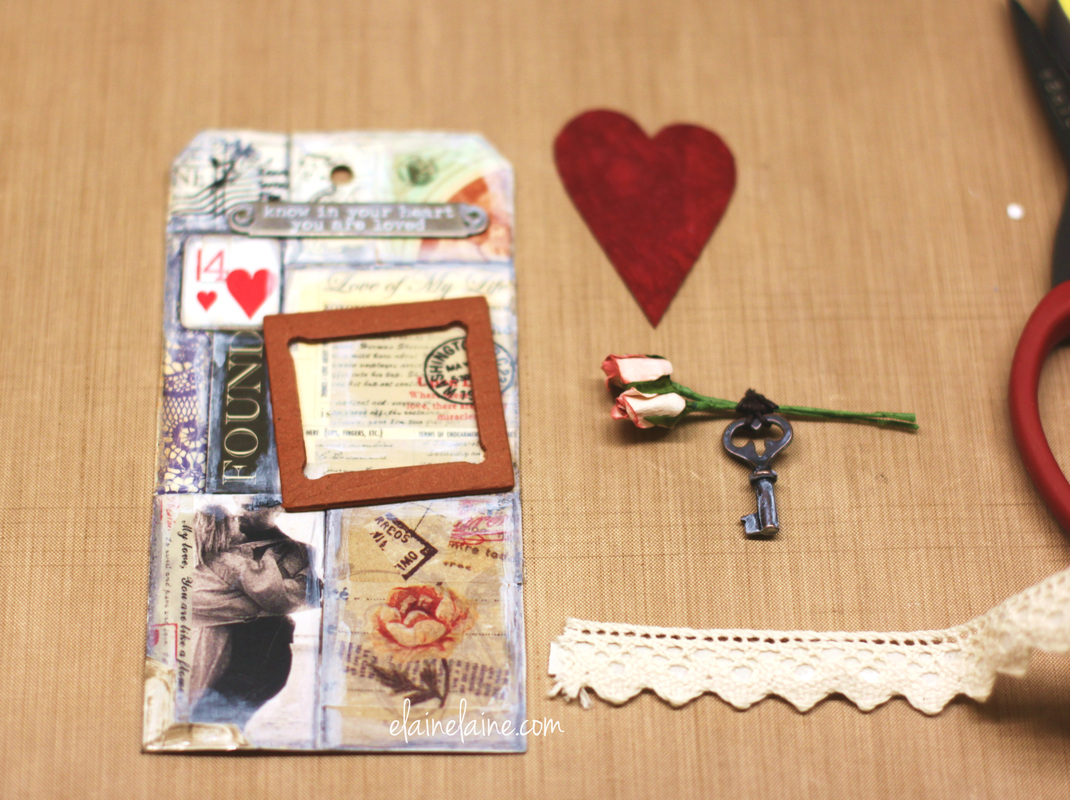
I really like the collage design with vintage look that Tim has created for February. Since it is February, it is all about LOVE. To see Tim's February Tag tutorial, you can click on the image below. 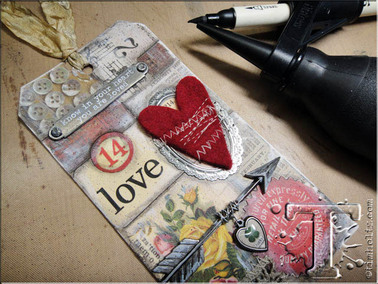 I want to share with you my take on the 12 Tags of 2015-February. I don't really have all the embellishments for this project, but I am very happy that I get a chance to use some of the ephemera that I collect over the years. ^^ Beside posting my tag for 12 Tags of 2015-February, I am also entering my "Key to My Heart" tag into Simon Says Stamp Monday Challenge Blog H is for... Obviously, H is for key to my "H"eart. 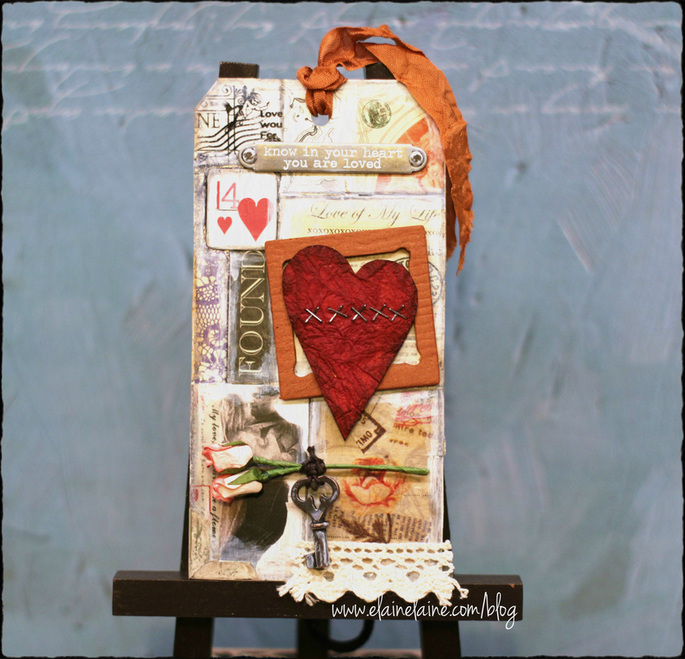 12 Tags of 2015-February Key to My Heart To begin, I start looking into my bit and stash boxes where I have collected things from everywhere. The square frame is a vintage slide frame that I found in an art thrift shop. Some postcards, business cards, bookmarks, washi tapes, and poker cards were used in this project. Don't forget to check out his amazing February creation on Timholtz.com. It is always fun to follow Tim's Tag tutorial. Thank you Tim!^^ 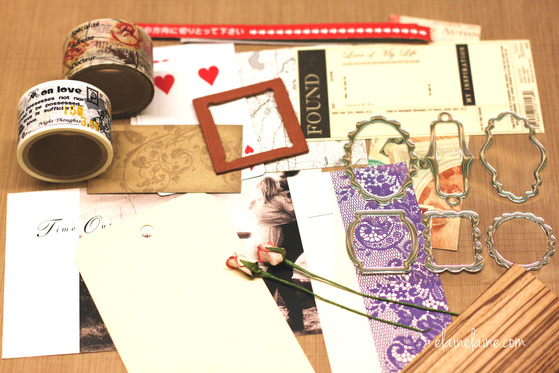
It's getting there.^^ 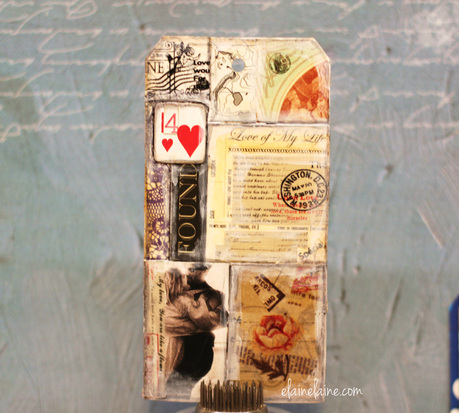
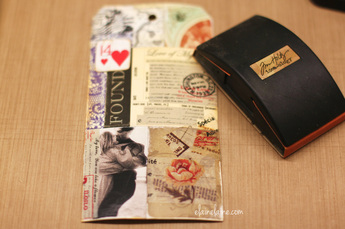
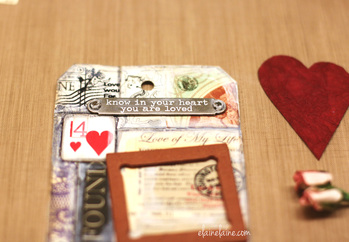
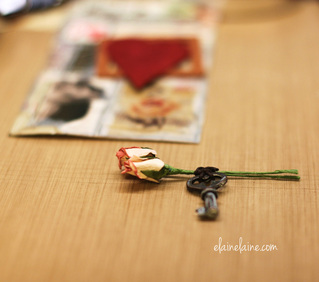
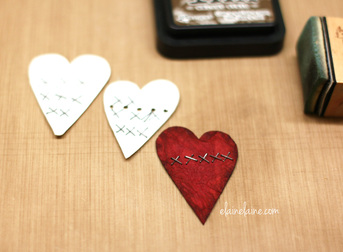
Here are some pictures of the details. 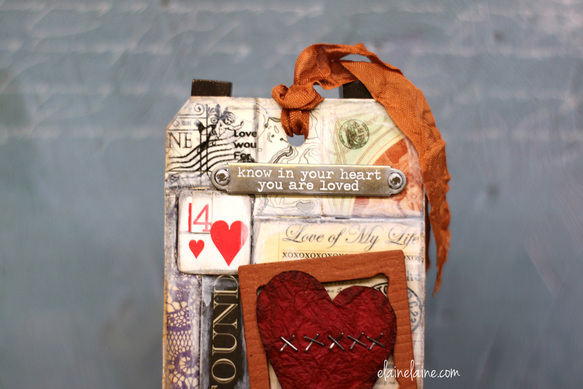 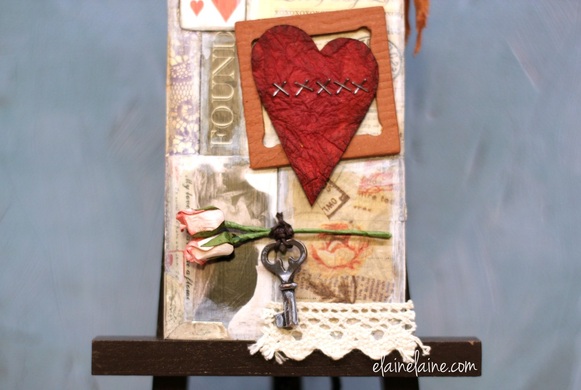 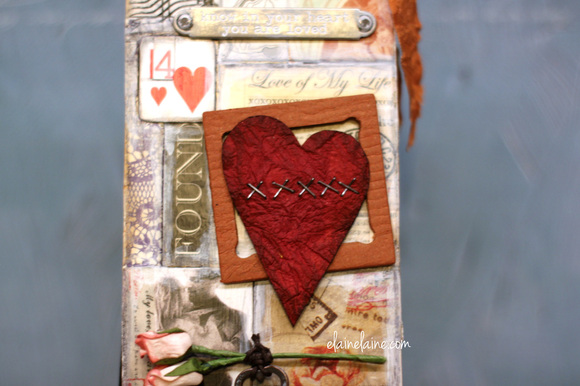 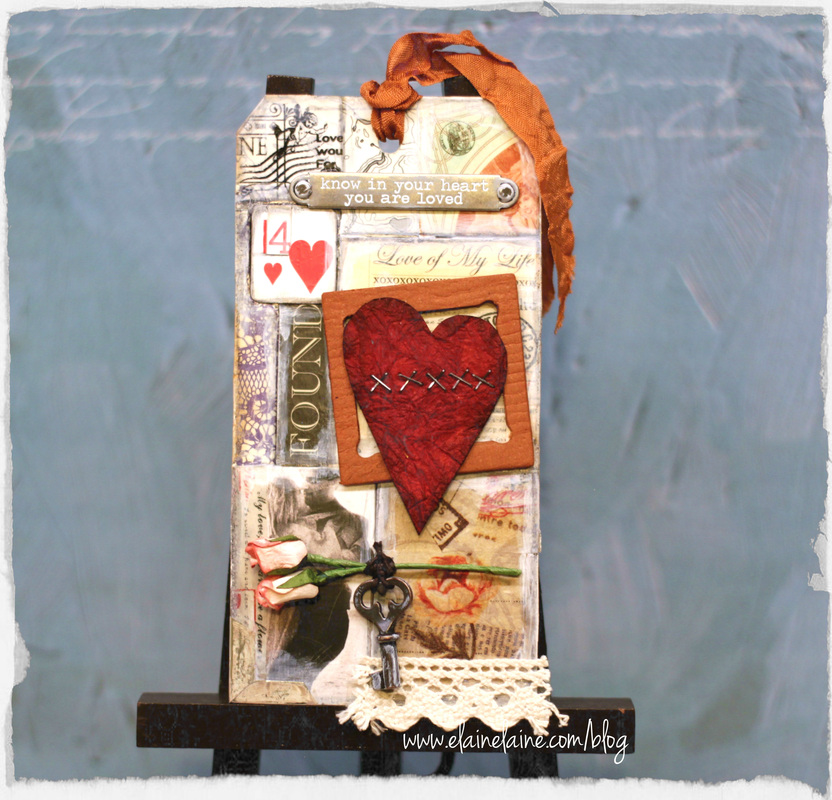 I hope you all will enjoy and love this tag just as much as I have enjoyed and loved creating it.
Thank you so much for stopping by and have a great day. Happy Valentines and see you soon~ |
Author
Elaine Lin 
elainelaine.com
Archives
June 2024
Categories
All


|


 RSS Feed